QEMU热迁移机制
Table of Contents
1. 虚拟机热迁移总体流程
虚拟机热迁移主要迁移内存数据(其它设备可以是block块设备等),所谓热迁移是src端的虚拟机并不会立即停止,而是虚拟机边运行,内存边往dst端迁移.这样就要求能够记录下哪些页面是脏的,Intel硬件可以使用PML硬件机制记录脏页,这些脏页信息一开始保存在内核kvm态,最终qemu会去拉取,并决定将哪些脏的页面发送出去.
脏页数据发送的通路可以是socket网络,也可以是rdma等其它方式.
由于虚拟机还在运行,那么产生脏页速率和发送脏页速率之间就有一个匹配问题,如果产生脏页的速率大于了发送脏页速率,热迁移是不会成功的.所以qemu里实现了一些机制,可以限制guest的运行频率.以下先按大的两两方面来总结下qemu虚拟机热迁移机制,后续的节将对这些细节代码进行分析,第一个方面是脏页跟踪机制,第二个方面虚拟机热迁移流程,从流程上说,脏页信息的流转相对虚拟机内存发送到dst端来说更加复杂些,因为脏页信息的维护要在kvm和qemu里各处流转处理,而虚拟机内存的发送主要就是qemu里开一个线程通过某种通道发送到dst即可,有了脏页信息就参考这个信息来发送哪些内存完事.
1.1. 脏页跟踪
1,虚拟机脏页跟踪有两种实现方式,一是通过修改页表属性,使其成为写保护,这样每次guest访问内存都会走page-fault流程,可以记录下虚拟机访问了哪些脏页,但是这种机制效率低下,intel cpu硬件上支持了自动记录虚拟机访问了哪些gfn到内存里,这个机制叫PML(Page-Modification Log).
2,PML需要qemu侧主动开启,这以KVM_MEM_LOG_DIRTY_PAGES这个标志来决定,它是qemu和kvm都能识别的一个标志,最终的开启动作是kvm来做,qemu guest通过ioctl接口(kvm_vm_ioctl,cmd: KVM_SET_USER_MEMORY__REGION)去调用.
3,guest侧开启PML的请求来到kvm后,会往vcpu的requests上挂入KVM_REQ_UPDATE_CPU_DIRTY_LOGGING请求,也就是说当时并没有立即设置相应的PML enable比特位.
4,等到下一次通过vcpu_enter_guest进入虚拟机时,就会处理挂在这上面的KVM_REQ_UPDATE_CPU_DIRTY_LOGGING请求,主要就是通过secondary_exec_controls_setbit来设置Secondary Processor-Based VM-Execution Controls的第17个bit位.
5,现代intel cpu一般都是支持PML的,所以vcpu创建初始化时,会通过alloc_page分配一个页面并将虚拟地址给到vmx->pml_pg,同时将这页的物理地址填到vmcs的PML_ADDRESS,物理上还有一个PML index的概念,指示某次guest访问gfn时,应将这个gfn填到这页的哪个位置.一页4KB大,每个访问条目信息占用8字节,64比特,所以共计可以有512个条目.
6,当PML页面被写满或者虚拟机因为其它原因退出时,在vm-exit的流程里,都会走vmx_flush_pml_buffer来将PML页面里的脏页信息vcpu->dirty_ring环形buffer里(较早版本的qemu不支持dirty_ring,但dirty_ring效率更高,主要基于这种方式分析),这样PML页面又可以被guest循环利用记录其它的guest对gfn的访问了.
7,一个脏页信息条目由结构体kvm_dirty_gfn表示,在同步到vcpu->dirty_ring时,会通过kvm_dirty_gfn_set_dirtied接口置上kvm_dirty_gfn.flags的KVM_DIRTY_GFN_F_DIRTY的位,表示现在这个条目被虚拟机访问过,需要qemu里热迁移相关的代码将其消耗发送给dst端,这里就可以看到一个生产者-消费者模型,kvm是生产者,而热迁移代码是消费者.
8,一旦热迁移代码将entry记录的页面发送给dst端后,就会通过dirty_gfn_set_collected将对应kvm_dirty_gfn.flags置上KVM_DIRTY_GFN_F_RESET,表示我热迁移代码作为消费者已经消费了脏页信息,现在通过kvm_vm_ioctl接口发送KVM_RESET_DIRTY_RINGS命令.
9,一旦kvm侧接受到KVM_RESET_DIRTY_RINGS的命令,检查vcpu->ring->dirty_gfns里所有的gfn,只要其kvm_dirty_gfn.flags为KVM_DIRTY_GFN_F_RESET时,就可以调用kvm_dirty_gfn_set_invalid将flags设置为0,表示前次对这个脏页的写已经全部处理完毕,未来再有guest访问这个gfn时,可以再次记录下.注意,原来为脏,没有及时发送对应页面数据又写了这个gfn对应的页面,这没什么问题,脏后脏是最新的信息,只要没漏就行.这些kvm_dirty_gfn:flags的状态转换实际上构成了一个简单的状态机.
10,dirty ring的方式就是避免了内核态和用户态的拷贝,这是怎么做到的呢?首先用户态在cpu->kvm_fd上调用mmap系统调用,将这个文件PAGE_SIZE * KVM_DIRTY_LOG_PAGE_OFFSET处映射到内核里(kvm)里的vcpu->dirty_ring,映射出来的地址给到用户态(qemu guest)CPUState:kvm_dirty_gfns,这样最终的效果就是,热迁移代码读取CPUState:kvm_dirty_gfns就是直接读取的内核里的脏页信息.
11,上面的"映射"依旧说的比较笼统,具体是怎么做的呢?对cpu->kvm_fd调用mmap时,最后会来到该文件对应的kvm_vcpu_mmap回调钩子来,里面就是初始化了PAGE*KVM_DIRTY_LOG_PAGE_OFFSET开始处的这个vma的vm_ops为kvm_vcpu_vm_ops,这个ops就是将来用户态进程访问CPUState:kvm_dirty_gfns时,查找的vma会调用的vma回调钩子集合,里面有自定义的缺页处理函数kvm_vcpu_fault,一旦用户态因为额访问CPUState:kvm_dirty_gfns触发缺页来到自定义的kvm_vcpu_fault缺页修复函数,就会将内核侧(kvm)里vcpu->dirty_ring所在的页面给到vm_fault:page,然后mm的公共流程里就会拿着这个page完成用户态进程对应CPUState:kvm_dirty_gfns虚拟地址的页表,这样下次再访问时,就可以访问到脏页所在的页面了.这种机制最后所造成的一个情况就是,用户态和内核态各有一个虚拟地址映射到同一个物理页面,这个页面最开始来自内核态分配,以实现共享避免内核态/用户态拷贝.
12,从内核里拿到的脏页信息在qemu里也是有流转过程的,首先是CPUState:kvm_dirty_gfns->KVMSlot:dirty_bmap,然后又到了全局的ram_list.dirty_memory里,最后又拆分到每个RAMBlock:bmap里,最终热迁移代码(函数migration_bitmap_find_dirty)其实直接看的是RAMBlock:bmap里的信息来决定发送脏页.
1.2. 热迁移流程
相比于脏信息的流转以及状态记录,热迁移本身的流程是简单直接的.
1,所有需要热迁移的模块(除了最重要的内存模块,还有其它模块也可能需要热迁移,比如block),自行通过register_savevm_live函数注册SaveStateEntry到全局savevm_state量里.
2,SaveStateEntry里最重要的成员就是SaveVMHandlers,这里面都是迁移各个阶段需要调用的回调函数,比如对于ram模块就是savevm_ram_handlers,在第一阶段需要调用的就是save_setup(ram模块就是ram_save_setup)进行发送前的准备,比如分配bmap脏页信息图,第二阶段要调用的就是save_live_iterate(ram_save_iterate)进行迭代发送,也包括了dst端需要运行的还原函数(ram_load).
3,虚拟机热迁移开始时,虚拟机并不会立即停止,而是边运行产生脏页,边发送,这也是催生复杂的脏页跟踪机制的原因.由此划分了迭代发送和最后一阶段的划分点,那就是剩下待发送的内存小于一轮能发送的阀值时,就可以停机src端的虚拟机了,进入第三阶段最后一轮发送.
4,如果虚拟机产生脏页的速率bytes_dirty_period > bytes_dirty_threshold时,可以通过mig_throttle_guest_down函数让vcpu线程睡眠,降低其运行频率,这样自然产生脏页的速率也就降低了.
2. 脏页跟踪机制
脏页信息最开始在内核侧kvm里记录,现在记录虚拟机写了哪些页面信息有两种方式,一是软件方式,将所有虚拟机使用的内存属性都改成写保护,这样每次虚拟机访问内存时,都会触发写保护异常,在异常流程里可以记录虚拟机访问了哪些页面,并且这次记录好了之后,退出异常流程前还要再次开启写保护,以使得下次可能还会访问该页面时,可以再次得到记录.
很显然,上述机制效率是低下的,另外一种硬件机制是Page Modification Log.本文主要基于PML这种硬件机制来介绍脏页追踪的功能.
PML硬件记录脏页的功能需要由qemu用户侧主动开启,代码流程会一路向下到内核kvm里,这里先介绍下Intel SDM对PML功能的说明。
2.1. PML功能基本介绍
Intel SDM3 27.2.6对PML有较为详细的介绍,这里简单总结下,PML可以开出一页的内存,每当虚拟机访问GPA时,最重要的信息GPA虚拟机物理地址就会作为一个entry放入这一页内存里,一页4KB的空间,共计512个entry.这一页的物理内存地址可以放入VMCS的PML Address域里,另外还有一个PML index域,用来指示现在将访问entry放入哪个位置.
2.2. qemu侧开启脏页记录
qemu侧开启脏页记录的一个路径可以是(逐步向下增长调用路径上的函数):
hmp_migrate->qmp_migrate
ERST

    {
        .name       = "migrate",
        .args_type  = "detach:-d,blk:-b,inc:-i,resume:-r,uri:s",
        .params     = "[-d] [-b] [-i] [-r] uri",
        .help       = "migrate to URI (using -d to not wait for completion)"
		      "\n\t\t\t -b for migration without shared storage with"
		      " full copy of disk\n\t\t\t -i for migration without "
		      "shared storage with incremental copy of disk "
		      "(base image shared between src and destination)"
                      "\n\t\t\t -r to resume a paused migration",
        .cmd        = hmp_migrate,
    },


SRST
``migrate [-d] [-b] [-i]`` *uri*
  Migrate to *uri* (using -d to not wait for completion).

  ``-b``
    for migration with full copy of disk
  ``-i``
    for migration with incremental copy of disk (base image is shared)
在qmp_migrate里依据不同uri接口可以调用不同的函数,比如tcp,unix以及vsock都走socket_start_outgoing_migration:
socket_start_outgoing_migration->socket_start_outgoing_migration_internal
在socket_start_outgoing_migration_internal函数里以socket_outgoing_migration作为callback调用qio_channel_socket_connect_async:
qio_channel_socket_connect_async(sioc,
                                 saddr,
                                 socket_outgoing_migration,
                                 data,
                                 socket_connect_data_free,
                                 NULL);
qio_channel_socket_connect_async函数里将socket_outgoing_migration作为callback参数调用qio_task_new构造一个QIOTask:
QIOTask *task = qio_task_new(
    OBJECT(ioc), callback, opaque, destroy);
SocketAddress *addrCopy;
QIOTask *qio_task_new(Object *source,
                      QIOTaskFunc func,
                      gpointer opaque,
                      GDestroyNotify destroy)
{
    QIOTask *task;
    ...
    task->func = func;
    ...
    return task;
}
这里可以看到,socket_outgoing_migration给到了QIOTask.func成员,那么为什么叫IO呢?可以理解虚拟机迁移,其实也就是将当前节点的内存发送到另外的节点,可以理解成IO操作.
然后qio_channel_socket_connect_async调用qio_task_run_in_thread函数,构造出的task作为第一个参数:
qio_task_run_in_thread(task,
                       qio_channel_socket_connect_worker,
                       addrCopy,
                       (GDestroyNotify)qapi_free_SocketAddress,
                       context);
最终会运行到开始提到的回调函数socket_outgoing_migration,该函数向下又有调用:
socket_outgoing_migration->migration_channel_connect->migrate_fd_connect
在migrate_fd_connect函数里,会创建一个名为live_migration的线程:
qemu_thread_create(&s->thread, "live_migration",
        migration_thread, s, QEMU_THREAD_JOINABLE);
该live_migration线程的工作函数为migration_thread,它向下又有调用链:
migration_thread->qemu_savevm_state_setup->save_setup(ram_save_setup)->ram_init_all->ram_init_bitmaps
在ram_init_bitmaps里以GLOBAL_DIRTY_MIGRATION这个标志(原因)启动脏页记录:
memory_global_dirty_log_start(GLOBAL_DIRTY_MIGRATION);
这个标志其意思就是现在因为迁移要开启了,所以哪些是脏页要记录下来,后面需要迁移这些脏页.除了开始迁移需要记录脏页,还有一个原因也可以开启脏页:
/* Possible bits for global_dirty_log_{start|stop} */

/* Dirty tracking enabled because migration is running */
#define GLOBAL_DIRTY_MIGRATION  (1U << 0)

/* Dirty tracking enabled because measuring dirty rate */
#define GLOBAL_DIRTY_DIRTY_RATE (1U << 1)

#define GLOBAL_DIRTY_MASK  (0x3)
memory_global_dirty_log_start函数里先把传进来的GLOBAL_DIRTY_MIGRATION和global_dirty_tracking相或又给到global_dirty_tracking,这样global_dirty_tracking就有一个新的比特位第bit 0位被设置了,其肯定不为0:
global_dirty_tracking |= flags;
然后memory_global_dirty_log_start继续向下调:
memory_region_transaction_commit->flatviews_reset->generate_memory_topology->render_memory_region
在render_memory_region函数里有:
...
FlatRange fr;
...
fr.dirty_log_mask = memory_region_get_dirty_log_mask(mr);
而memory_region_get_dirty_log_mask如下:
uint8_t memory_region_get_dirty_log_mask(MemoryRegion *mr)
{
    uint8_t mask = mr->dirty_log_mask;
    RAMBlock *rb = mr->ram_block;

    if (global_dirty_tracking && ((rb && qemu_ram_is_migratable(rb)) ||
                             memory_region_is_iommu(mr))) {
        mask |= (1 << DIRTY_MEMORY_MIGRATION);
    }

    if (tcg_enabled() && rb) {
        /* TCG only cares about dirty memory logging for RAM, not IOMMU.  */
        mask |= (1 << DIRTY_MEMORY_CODE);
    }
    return mask;
}
这里最主要的条件其实就是global_dirty_tracking,前面看到了global_dirty_tracking第0位被设置了,其肯定是有值的,所以返回的mask其第DIRTY_MEMORY_MIGRATION个比特位也就被设置了(就是bit 2).memory_region_transaction_commit完成对flatviews_reset的调用后(就是设置新的FlatRange:dirty_log_mask)又调用address_space_set_flatview:
memory_region_transaction_commit->address_space_set_flatview->address_space_update_topology_pass
在address_space_update_topology_pass里就可以看到利用FlatRange:dirty_log_mask作为条件判断是否开启脏页记录了:
static void address_space_update_topology_pass(AddressSpace *as,
                                               const FlatView *old_view,
                                               const FlatView *new_view,
                                               bool adding)
{
    ...
    FlatRange *frold, *frnew;
    ...
            if (adding) {
                MEMORY_LISTENER_UPDATE_REGION(frnew, as, Forward, region_nop);
                if (frnew->dirty_log_mask & ~frold->dirty_log_mask) {
                    MEMORY_LISTENER_UPDATE_REGION(frnew, as, Forward, log_start,
                                                  frold->dirty_log_mask,
                                                  frnew->dirty_log_mask);
                }
                if (frold->dirty_log_mask & ~frnew->dirty_log_mask) {
                    MEMORY_LISTENER_UPDATE_REGION(frnew, as, Reverse, log_stop,
                                                  frold->dirty_log_mask,
                                                  frnew->dirty_log_mask);
                }

}
条件frnew->dirty_log_mask & ~frold->dirty_log_mask就是说原来旧的FlatRange:dirty_log_mask没有设置的而新的FlatRange:dirty_log_mask有设置的话,就调用MEMORY_LISTENER_UPDATE_REGION进行更新,可以看到调用它的第四个参数是log_start,而MEMORY_LISTENER_UPDATE_REGION的实现如下:
#define MEMORY_LISTENER_UPDATE_REGION(fr, as, dir, callback, _args...)  \
    do {                                                                \
        MemoryRegionSection mrs = section_from_flat_range(fr,           \
                address_space_to_flatview(as));                         \
        MEMORY_LISTENER_CALL(as, callback, dir, &mrs, ##_args);         \
    } while(0)
在MEMORY_LISTENER_CALL里会调用log_start这个函数了:
_listener->_callback(_listener, _section, ##_args);
对于kvm memory listener来说,这个log_start函数就是kvm_log_start:
kml->listener.log_start = kvm_log_start;
关于其初始化的流程,本文就不赘述了. kvm_log_start有如下调用链:
kvm_log_start->kvm_section_update_flags->kvm_slot_update_flags
kvm_slot_update_flags函数定义如下:
static int kvm_slot_update_flags(KVMMemoryListener *kml, KVMSlot *mem,
                                 MemoryRegion *mr)
{
    mem->flags = kvm_mem_flags(mr);

    /* If nothing changed effectively, no need to issue ioctl */
    if (mem->flags == mem->old_flags) {
        return 0;
    }

    kvm_slot_init_dirty_bitmap(mem);
    return kvm_set_user_memory_region(kml, mem, false);
}
先是调用了kvm_mem_flags,然后调用kvm_set_user_memory_region.先看kvm_mem_flags:
static int kvm_mem_flags(MemoryRegion *mr)
{
    bool readonly = mr->readonly || memory_region_is_romd(mr);
    int flags = 0;

    if (memory_region_get_dirty_log_mask(mr) != 0) {
        flags |= KVM_MEM_LOG_DIRTY_PAGES;
    }
    if (readonly && kvm_readonly_mem_allowed) {
        flags |= KVM_MEM_READONLY;
    }
    return flags;
}
这里重点关注给flags或上了KVM_MEM_LOG_DIRTY_PAGES,而这个标志内核里的kvm模块能够识别,并用来开启硬件PML,这个流程在下节"kvm侧开启脏页记录"会详细描述.注意这里判断是否要给flags或上KVM_MEM_LOG_DIRTY_PAGES这个标志,采用了函数memory_region_get_dirty_log_mask的返回值进行判断,前面分析过,只要global_dirty_tracking有值,其返回值非0,这样kvm_mem_flags返回的flags肯定就置上了KVM_MEM_LOG_DIRTY_PAGES.
kvm_slot_update_flags随后调用了kvm_set_user_memory_region,在后者函数里有代码:
static int kvm_set_user_memory_region(KVMMemoryListener *kml, KVMSlot *slot, bool new)
{
    ...
    struct kvm_userspace_memory_region mem;
    mem.flags = slot->flags;
    ...
        ret = kvm_vm_ioctl(s, KVM_SET_USER_MEMORY_REGION, &mem);
    ...
}
slot->flags是带有KVM_MEM_LOG_DIRTY_PAGES的,这里又给到了kvm_userspace_memory_region:flags,因为内核kvm和qemu都可以识别kvm_userspace_memory_region这个结构体,显而易见,这个mem(kvm_userspace_memory_region)就要通过ioctl系统调用带到内核态了. 从这里向下就到内核了,以KVM_SET_USER_MEMORY_REGION命令进入ioctl,后续kvm的流程留到下节.
2.3. kvm侧开启脏页记录
当kvm_vm_ioctl来到内核时,kvm里有个同名函数会处理这个ioctl请求:
static long kvm_vm_ioctl(struct file *filp,
			   unsigned int ioctl, unsigned long arg)
{
    ...
	case KVM_SET_USER_MEMORY_REGION: {
		struct kvm_userspace_memory_region kvm_userspace_mem;

		r = -EFAULT;
		if (copy_from_user(&kvm_userspace_mem, argp,
						sizeof(kvm_userspace_mem)))
			goto out;

		r = kvm_vm_ioctl_set_memory_region(kvm, &kvm_userspace_mem);
		break;
	}
    ...
}
可以看到这个case就是qemu调用ioctl的命令编号:KVM_SET_USER_MEMORY_REGION.同时可以看到,用户态传来的kvm_userspace_memory_region通过copy_from_user拷贝了内核态里的kvm_userspace_mem,其flags带有KVM_MEM_LOG_DIRTY_PAGES.
从kvm_vm_ioctl_set_memory_region向下有如下调用链:
kvm_vm_ioctl_set_memory_region->kvm_set_memory_region->__kvm_set_memory_region
在__kvm_set_memory_region里,又引入了kvm_memory_slot概念:
int __kvm_set_memory_region(struct kvm *kvm,
			    const struct kvm_userspace_memory_region *mem)
{
	struct kvm_memory_slot old, new;
	...
	new.flags = mem->flags;
}
在这里可以看到,带有KVM_MEM_LOG_DIRTY_PAGES标志的flags又被转给了kvm_memory_slot:flags.从__kvm_set_memory_region继续往下:
__kvm_set_memory_region->kvm_arch_commit_memory_region->kvm_mmu_slot_apply_flags
在kvm_mmu_slot_apply_flags函数里:
static void kvm_mmu_slot_apply_flags(struct kvm *kvm,
				     struct kvm_memory_slot *old,
				     struct kvm_memory_slot *new,
				     enum kvm_mr_change change)
{
	bool log_dirty_pages = new->flags & KVM_MEM_LOG_DIRTY_PAGES;

	/*
	 * Update CPU dirty logging if dirty logging is being toggled.  This
	 * applies to all operations.
	 */
	if ((old->flags ^ new->flags) & KVM_MEM_LOG_DIRTY_PAGES)
		kvm_mmu_update_cpu_dirty_logging(kvm, log_dirty_pages);
	...
}
log_dirty_pages相当于是取出了kvm_memory_slot:flags里第KVM_MEM_LOG_DIRTY_PAGES这个bit位的设置情况,log_dirty_pages为0代表没有设置,为1代表设置了.下面的if判断条件意义是:只要原来flags和新的flags在KVM_MEM_LOG_DIRTY_PAGES这个比特位上发生变化时,都会调用kvm_mmu_update_cpu_dirty_logging函数,但是注意第二个参数指定了是否开启PML,kvm_mmu_slot_apply_flags定义如下:
static void kvm_mmu_update_cpu_dirty_logging(struct kvm *kvm, bool enable)
{
	struct kvm_arch *ka = &kvm->arch;

	if (!kvm_x86_ops.cpu_dirty_log_size)
		return;

	if ((enable && ++ka->cpu_dirty_logging_count == 1) ||
	    (!enable && --ka->cpu_dirty_logging_count == 0))
		kvm_make_all_cpus_request(kvm, KVM_REQ_UPDATE_CPU_DIRTY_LOGGING);

	WARN_ON_ONCE(ka->cpu_dirty_logging_count < 0);
}
一般开启PML功能第一个条件就会满足.kvm_make_all_cpus_request只是将KVM_REQ_UPDATE_CPU_DIRTY_LOGGING这个请求给挂到vcpu->requests了,并没有立即写硬件相关的bit位.如下调用链:
kvm_make_all_cpus_request->kvm_make_all_cpus_request_except->kvm_make_vcpus_request_mask->kvm_make_request
最后的kvm_make_request如下:
static inline void kvm_make_request(int req, struct kvm_vcpu *vcpu)
{
	/*
	 * Ensure the rest of the request is published to kvm_check_request's
	 * caller.  Paired with the smp_mb__after_atomic in kvm_check_request.
	 */
	smp_wmb();
	set_bit(req & KVM_REQUEST_MASK, (void *)&vcpu->requests);
}
可以看到只是设了一个bit位.那么什么时候设置硬件的比特位,以开启PML功能呢?搜索KVM_REQ_UPDATE_CPU_DIRTY_LOGGING知道,在下一次通过vcpu_enter_guest进入虚拟机时会处理挂在vcpu->requests上的请求:
if (kvm_check_request(KVM_REQ_UPDATE_CPU_DIRTY_LOGGING, vcpu))
	static_call(kvm_x86_update_cpu_dirty_logging)(vcpu);
kvm_x86_update_cpu_dirty_logging符号通过KVM_X86_OP_NULL展开:
KVM_X86_OP_NULL(update_cpu_dirty_logging)
#define KVM_X86_OP(func) \
	DECLARE_STATIC_CALL(kvm_x86_##func, *(((struct kvm_x86_ops *)0)->func));
#define DECLARE_STATIC_CALL(name, func)					\
	extern struct static_call_key STATIC_CALL_KEY(name);		\
	extern typeof(func) STATIC_CALL_TRAMP(name);
可以看到,最后实际调用的是kvm_x86_ops:update_cpu_dirty_logging,其就是vmx_update_cpu_dirty_logging:
.update_cpu_dirty_logging = vmx_update_cpu_dirty_logging,
vmx_update_cpu_dirty_logging会调用secondary_exec_controls_setbit:
secondary_exec_controls_setbit(vmx, SECONDARY_EXEC_ENABLE_PML);
SECONDARY_EXEC_ENABLE_PML定义如下:
#define SECONDARY_EXEC_ENABLE_PML               VMCS_CONTROL_BIT(PAGE_MOD_LOGGING)
#define VMCS_CONTROL_BIT(x)	BIT(VMX_FEATURE_##x & 0x1f)
#define BIT(nr)			(UL(1) << (nr))
#define VMX_FEATURE_PAGE_MOD_LOGGING	( 2*32+ 17) /* "pml" Log dirty pages into buffer */
这其实就是Secondary Processor-Based VM-Execution Controls的第17个bit位,intel虚拟化手册对这个位解释如下:
17 Enable PML If this control is 1, an access to a guest-physical address that sets an EPT dirty bit first adds an entry to the page-modification. See Section 27.2.6.
可以很清楚的看到,这个bit就是开启PML功能的.
再来看secondary_exec_controls_setbit的定义,其是宏定义拼接的:
BUILD_CONTROLS_SHADOW(secondary_exec, SECONDARY_VM_EXEC_CONTROL)
#define BUILD_CONTROLS_SHADOW(lname, uname)				    \
static inline void lname##_controls_set(struct vcpu_vmx *vmx, u32 val)	    \
{									    \
	if (vmx->loaded_vmcs->controls_shadow.lname != val) {		    \
		vmcs_write32(uname, val);				    \
		vmx->loaded_vmcs->controls_shadow.lname = val;		    \
	}								    \
}									    \
static inline u32 __##lname##_controls_get(struct loaded_vmcs *vmcs)	    \
{									    \
	return vmcs->controls_shadow.lname;				    \
}									    \
static inline u32 lname##_controls_get(struct vcpu_vmx *vmx)		    \
{									    \
	return __##lname##_controls_get(vmx->loaded_vmcs);		    \
}									    \
static inline void lname##_controls_setbit(struct vcpu_vmx *vmx, u32 val)   \
{									    \
	lname##_controls_set(vmx, lname##_controls_get(vmx) | val);	    \
}									    \
static inline void lname##_controls_clearbit(struct vcpu_vmx *vmx, u32 val) \
{									    \
	lname##_controls_set(vmx, lname##_controls_get(vmx) & ~val);	    \
}
先看SECONDARY_VM_EXEC_CONTROL的实现,它是在vmcs中的一个偏移:
enum vmcs_field {
...
	SECONDARY_VM_EXEC_CONTROL       = 0x0000401e,
...
}
这个偏移在intel虚拟化手册里的定义正是Secondary Processor-Based VM-Execution Controls寄存器。
再看secondary_exec_controls_setbit的实现,先通过secondary_exec_controls_get拿到原来的vmcs->controls_shadow:secondary_exec这个u32的值和新的val(1<<17)相或,然后在secondary_controls_set里通过vmcs_write32写到当前vmcs的secondary exec control字段,这样就启动了PML功能,关于vmcs_write32的实现如下,当然最后肯定是内联了:
static __always_inline void vmcs_write32(unsigned long field, u32 value)
{
	vmcs_check32(field);
	if (static_branch_unlikely(&enable_evmcs))
		return evmcs_write32(field, value);

	__vmcs_writel(field, value);
}

static __always_inline void __vmcs_writel(unsigned long field, unsigned long value)
{
	vmx_asm2(vmwrite, "r"(field), "rm"(value), field, value);
}
vmwrite就是操作当前cpu的VMCS,关于它intel虚拟化手册有详尽描述.
2.4. kvm侧记录脏页流程
在前面介绍了qemu+kvm共同开启了PML硬件记录脏页的功能,本小节想分析下kvm内核侧记录脏页的流程,根据intel虚拟化手册,本质上开启PML后,脏页的记录实际上由cpu自动完成,每当guest虚拟机访问内存时,cpu会自动将GPA记录到pml buffer里,软件没有太多的工作,软件里主要是在pml buffer满时将脏信息搬移到dirty ring环形区里,qemu 6.2使用了kvm内核里的kvm_vcpu:dirty_ring以提高效率,而qemu 4.2使用了kvm内核里传统的kvm_memory_slot:dirty_bitmap,后面主要分析dirty ring的方式,而简单分析下dirty_bitmap方式.使用dirty ring的方式避免了内核态/用户态的数据拷贝,提高了效率,后面将详细看到这个过程.
首先在创建vcpu而初始化vmcs的流程里vmx_create_vcpu->init_vmcs:
if (enable_pml) {
	    vmcs_write64(PML_ADDRESS, page_to_phys(vmx->pml_pg));
	    vmcs_write16(GUEST_PML_INDEX, PML_ENTITY_NUM - 1);
    }
enable_pml作为一个模块参数,默认为1:
bool __read_mostly enable_pml = 1;
module_param_named(pml, enable_pml, bool, S_IRUGO);
根据intel虚拟化手册PML_ADDRESS就是vmcs里用来保存pml buffer地址的寄存器:
enum vmcs_field {
    ...
	PML_ADDRESS			= 0x0000200e,
	...
};
page_to_phys是将一个页面转换成物理地址,cpu访问pml address地址时不需要经过mmu,直接拿着物理地址往内存硬件单元上发送,而pml_pg同样在vmx_create_vcpu的初始化流程里分配:
if (enable_pml) {
	vmx->pml_pg = alloc_page(GFP_KERNEL_ACCOUNT | __GFP_ZERO);
	if (!vmx->pml_pg)
		goto free_vpid;
}
根据intel虚拟化手册,pml log buffer是由512个64-bit的条目组成的,所以使用alloc_page分配一页空间就行.然后使用vmcs_write64写入到vmcs的PML_ADDRSS字段即硬件上生效.根据intel虚拟化手册,pml功能还有一个pml index的vmcs字段,它控制了现在可以写pml buffer的哪个条目,它从511递减到0,然后就会产生一个page-modification log-full event导致虚拟机退出:
enum vmcs_field {
	...
	GUEST_PML_INDEX			= 0x00000812,
	...
};
#define PML_ENTITY_NUM 512
可以看到GUEST_PML_INDEX通过vmcs_write16被初始化最大值511. 当前面小节介绍的enable pml bit打开,pml address以及pml index都设置好后,cpu硬件在每次访问GPA时,都会记录下来这次访问到pml buffer. 当虚拟机因为page-modification log-full event退出时,就会产生vm exit,这会退到宿主机(kvm)里有先有统一的接口去处理:__vmx_handle_exit,page-modification log-full event在kvm里其实是有专门的处理函数的,叫handle_pml_full,只是这个函数较为简单,并没有保存pml buffer里的脏信息到内存别处的动作.保存的动作另在如下路径:
__vmx_handle_exit->vmx_flush_pml_buffer
换言之,只要有虚拟机退出,就会做一下pm buffer同步的事情(这当然也包括page-modification log-full event引起的vm exit),后面会有代码看到,软件正是利用了这个特点,可以主动kick cpu一次调度而引起vm exit,从而调用一次vmx_flush_pml_buffer来同步pml buffer.
现在看下vmx_flush_pml_buffer:
static void vmx_flush_pml_buffer(struct kvm_vcpu *vcpu)
{
	struct vcpu_vmx *vmx = to_vmx(vcpu);
	u64 *pml_buf;
	u16 pml_idx;

	pml_idx = vmcs_read16(GUEST_PML_INDEX);

	/* Do nothing if PML buffer is empty */
	if (pml_idx == (PML_ENTITY_NUM - 1))
		return;

	/* PML index always points to next available PML buffer entity */
	if (pml_idx >= PML_ENTITY_NUM)
		pml_idx = 0;
	else
		pml_idx++;

	pml_buf = page_address(vmx->pml_pg);
	for (; pml_idx < PML_ENTITY_NUM; pml_idx++) {
		u64 gpa;

		gpa = pml_buf[pml_idx];
		WARN_ON(gpa & (PAGE_SIZE - 1));
		kvm_vcpu_mark_page_dirty(vcpu, gpa >> PAGE_SHIFT);
	}

	/* reset PML index */
	vmcs_write16(GUEST_PML_INDEX, PML_ENTITY_NUM - 1);
}
首先从vmcs的GUEST_PML_INDEX字段读出了当前的pml index指向哪个条目,pml_buf相当于又拿到pml page的虚拟地址,因为现在软件访问pml页面需要经过mmu,必须以虚拟地址的形式.注意for循环是从当前的pml index往高处的pml entry去遍历,因为根据intel虚拟化手册,硬件写脏页条目信息到pml buffer是从最高的511个条目往下写的.for循环里比较关键的是调用kvm_vcpu_mark_page_dirty保存脏页信息,其第一个参数vcpu其实就是当前引起vm exit的vcpu,而第二个参数是当前要记录的gpa,它左移了一个页面的大小,就是说对一个页面内的访问(任何字节)的访问都将只占据一个pml entry条目,这可以节省pml page的大小.vmx_flush_pml_buffer的最后reset了pml index,这样硬件又可以重复使用pml entry存储未来guest对GPA的访问了.
继续往下分析kvm_vcpu_mark_page_dirty:
void kvm_vcpu_mark_page_dirty(struct kvm_vcpu *vcpu, gfn_t gfn)
{
	struct kvm_memory_slot *memslot;

	memslot = kvm_vcpu_gfn_to_memslot(vcpu, gfn);
	mark_page_dirty_in_slot(vcpu->kvm, memslot, gfn);
}
kvm_vcpu_gfn_to_memslot就不展示它的代码进行详细的分析了,总结来说,所有的gfn都由一个个的kvm_memory_slot去管理,里面记录了一个kvm_memory_slot的起始base_gfn,管理的多少页面npages,同时这段gfn的脏信息就存在dirty_bitmap,只不过使用kvm_memory_slot:dirty_bitmap来存储脏页信息已经不是较新的qemu 6.2的方式了.kvm_vcpu_gfn_to_memslot函数主要是通过gfn采用二分搜索的办法,去找到这个gfn被哪个kvm_memory_slot所管理.
kvm_vcpu_gfn_to_memslot->search_memslots->try_get_memslot函数里有个预防侧信道攻击的接口这里可以简单提下:
/*
 * slot_index can come from vcpu->last_used_slot which is not kept
 * in sync with userspace-controllable memslot deletion. So use nospec
 * to prevent the CPU from speculating past the end of memslots[].
 */
slot_index = array_index_nospec(slot_index, slots->used_slots);
slot = &slots->memslots[slot_index];
通过array_index_nospec将数组索引slot_index钳制(clamp)在o-size之间,这样后续使用这个索引访问数组内容时,不会出现越界问题.array_index_nospec返回的slot_index和后面使用这个slot_index去访问数组内容,人为构造了数据依赖,这样现代cpu不会因为乱序/推测执行而先用了未经clamp的索引去访问数组,这种方式比内存屏障会轻量一些.
继续分析mark_page_dirty_in_slot函数:
void mark_page_dirty_in_slot(struct kvm *kvm,
			     struct kvm_memory_slot *memslot,
		 	     gfn_t gfn)
{
	if (memslot && kvm_slot_dirty_track_enabled(memslot)) {
		unsigned long rel_gfn = gfn - memslot->base_gfn;
		u32 slot = (memslot->as_id << 16) | memslot->id;

		if (kvm->dirty_ring_size)
			kvm_dirty_ring_push(kvm_dirty_ring_get(kvm),
					    slot, rel_gfn);
		else
			set_bit_le(rel_gfn, memslot->dirty_bitmap);
	}
}
kvm_slot_dirty_track_enabled会检查前面的节提到过的KVM_MEM_LOG_DIRTY_PAGES标志.
从这个函数就可以看到脏页信息可以有两种方式去保存一种是脏页环形缓冲区,一种是脏页位图.先简单介绍下脏页位图,因为较新的qemu版本已经很少使用这种低效率的方式了.首先在mark_page_dirty_in_slot这里的函数可以看到,rel_gfn是相对于当前kvm_memory_slot:base_gfn的相对偏移gfn,也就是说kvm_memory_slot:dirty_bitmap只是记录当前memslot的脏页信息,这通过set_bit_le置上相应的bit位即可.
针对kvm_memory_slot:dirty_bitmap的方式,内核kvm侧提供一个ioctl接口,用来同步内核侧的脏页信息到用户态qemu:
static long kvm_vm_ioctl(struct file *filp,
			   unsigned int ioctl, unsigned long arg)
{
  ...
	case KVM_GET_DIRTY_LOG: {
		struct kvm_dirty_log log;

		r = -EFAULT;
		if (copy_from_user(&log, argp, sizeof(log)))
			goto out;
		r = kvm_vm_ioctl_get_dirty_log(kvm, &log);
		break;
	}
  ...
}
然后在kvm_vm_ioctl_get_dirty_log->kvm_get_dirty_log_protect里有:
static int kvm_get_dirty_log_protect(struct kvm *kvm, struct kvm_dirty_log *log)
{
    ...
	unsigned long *dirty_bitmap;
	...
	dirty_bitmap = memslot->dirty_bitmap;
	...
	} else {
		dirty_bitmap_buffer = kvm_second_dirty_bitmap(memslot);
		memset(dirty_bitmap_buffer, 0, n);

		KVM_MMU_LOCK(kvm);
		for (i = 0; i < n / sizeof(long); i++) {
			unsigned long mask;
			gfn_t offset;

			if (!dirty_bitmap[i])
				continue;

			flush = true;
			mask = xchg(&dirty_bitmap[i], 0);
			dirty_bitmap_buffer[i] = mask;

			offset = i * BITS_PER_LONG;
			kvm_arch_mmu_enable_log_dirty_pt_masked(kvm, memslot,
								offset, mask);
		}
		KVM_MMU_UNLOCK(kvm);
	}

	if (flush)
		kvm_arch_flush_remote_tlbs_memslot(kvm, memslot);

	if (copy_to_user(log->dirty_bitmap, dirty_bitmap_buffer, n))
	...
}
从这段代码可以很清楚的看到,kvm_memory_slot:dirty_bitmap先是被xchg到一个dirty_bitmap_buffer,然后又将它copy_to_user空间,这也就是前面提到的,使用dirty_bitmap方式效率较低,因为这种方式存在内核态/用户态拷贝.
下面重点介绍脏页环形缓冲区的方式.
dirty ring功能涉及qemu/kvm的配合,qemu侧的支持在下一节去介绍.内核kvm侧通过如下的补丁引入了对dirty ring的基本支持:
fb04a1eddb1a65b6588a021bdc132270d5ae48bb 最早在v5.11引入
我们的内核在372引入了这个功能,147没有.
如果qemu侧支持dirty ring的功能(具体见下节),那么就可以发起KVM_CAP_DIRTY_LOG_RING的ioctl,这个ioctl cmd的处理函数是kvm_vm_ioctl_enable_dirty_log_ring:
static int kvm_vm_ioctl_enable_cap_generic(struct kvm *kvm,
					   struct kvm_enable_cap *cap)
{
    ...
	case KVM_CAP_DIRTY_LOG_RING:
		return kvm_vm_ioctl_enable_dirty_log_ring(kvm, cap->args[0]);
    ...
}
而在kvm_vm_ioctl_enable_dirty_log_ring函数里,会设置kvm:dirty_ring_size:
static int kvm_vm_ioctl_enable_dirty_log_ring(struct kvm *kvm, u32 size)
{
    ...
	} else {
		kvm->dirty_ring_size = size;
		r = 0;
	}
    ...
}
size是qemu用户态传来的,当size大于0时,就相当于是开启了内核的dirty ring功能,同时在kvm_vm_ioctl_enable_dirty_log_ring函数里会有判断传进来的size最大为KVM_DIRTY_RING_MAX_ENTRIES(65536),在前面的mark_page_dirty_in_slot函数里正是利用了kvm:dirty_ring_size来作为判断条件看是否走kvm_dirty_ring_push函数这种dirty ring的方式记录脏页.
现在回到mark_page_dirty_in_slot继续往下分析内核kvm侧的脏页记录(dirty ring方式),先看一个获取kvm_dirty_ring的辅助函数:
struct kvm_dirty_ring *kvm_dirty_ring_get(struct kvm *kvm)
{
	struct kvm_vcpu *vcpu = kvm_get_running_vcpu();

	WARN_ON_ONCE(vcpu->kvm != kvm);

	return &vcpu->dirty_ring;
}
struct kvm_vcpu *kvm_get_running_vcpu(void)
{
	struct kvm_vcpu *vcpu;

	preempt_disable();
	vcpu = __this_cpu_read(kvm_running_vcpu);
	preempt_enable();

	return vcpu;
}
可以看到kvm_dirty_ring是per-vcpu的,也就是每个vcpu都有一个dirty ring,同时pcp变量kvm_running_vcpu记录了当前物理cpu上运行的是哪个vcpu.继续往下看mark_page_dirty_in_slot调用的kvm_dirty_ring_push:
void kvm_dirty_ring_push(struct kvm_dirty_ring *ring, u32 slot, u64 offset)
{
	struct kvm_dirty_gfn *entry;

	/* It should never get full */
	WARN_ON_ONCE(kvm_dirty_ring_full(ring));

	entry = &ring->dirty_gfns[ring->dirty_index & (ring->size - 1)];

	entry->slot = slot;
	entry->offset = offset;
	/*
	 * Make sure the data is filled in before we publish this to
	 * the userspace program.  There's no paired kernel-side reader.
	 */
	smp_wmb();
	kvm_dirty_gfn_set_dirtied(entry);
	ring->dirty_index++;
	trace_kvm_dirty_ring_push(ring, slot, offset);
}
先从dirty_gfns里拿出kvm_dirty_gfn,这个结构体内核/qemu都可以解释其格式,后面会介绍是因为dirty_gfns正是在内核空间和qemu用户空间共享的内存.kvm_dirty_gfn其实就是描述了guest访问某个gfn时关于脏信息的集合.前面分析父函数mark_page_dirty_in_slot时,知道offset其实是相对于当前gfn所在的kvm_memory_slot的base_gfn,同时slot号由kvm_memory_slot:as_id以及kvm_memory_slot:id两部分组成形成该gfn所属的槽号,也会记录到kvm_dirty_gfn里.kvm_dirty_ring_push里另一个调用的关键函数是kvm_dirty_gfn_set_dirtied:
static inline void kvm_dirty_gfn_set_dirtied(struct kvm_dirty_gfn *gfn)
{
	gfn->flags = KVM_DIRTY_GFN_F_DIRTY;
}
这里其实是设置了当前gfn的状态,表示写脏了,guest刚访问过,KVM_DIRTY_GFN_F_DIRTY就代表gfn的一种dirty状态,这里涉及到gfn状态变化的一个简单状态机,直接引用内核代码的注释:
/*
 * KVM dirty GFN flags, defined as:
 *
 * |---------------+---------------+--------------|
 * | bit 1 (reset) | bit 0 (dirty) | Status       |
 * |---------------+---------------+--------------|
 * |             0 |             0 | Invalid GFN  |
 * |             0 |             1 | Dirty GFN    |
 * |             1 |             X | GFN to reset |
 * |---------------+---------------+--------------|
 *
 * Lifecycle of a dirty GFN goes like:
 *
 *      dirtied         harvested        reset
 * 00 -----------> 01 -------------> 1X -------+
 *  ^                                          |
 *  |                                          |
 *  +------------------------------------------+
 *
 * The userspace program is only responsible for the 01->1X state
 * conversion after harvesting an entry.  Also, it must not skip any
 * dirty bits, so that dirty bits are always harvested in sequence.
 */
#define KVM_DIRTY_GFN_F_DIRTY           _BITUL(0)
#define KVM_DIRTY_GFN_F_RESET           _BITUL(1)
#define KVM_DIRTY_GFN_F_MASK            0x3
也就是说guest访问过的gfn,由内核kvm置脏(因为内核通过PML硬件机制首先知道了哪些gfn被访问过),然后由qemu userspace去harvested,说白了这里其实就有一个生产者-消费者模型,内核记录脏页,由qemu(具体的就是live migration相关的代码)去消费.当qemu消费(harvested)了脏页信息,又需要推进状态机,变kvm_dirty_gfn:flags为KVM_DIRTY_GFN_F_RESET.前面介绍的其实都是直接使用kvm_dirty_gfn的空间了,但是关于其来源(分配)并没有分析,现在分析这点.
在创建vcpu时,就会检查kvm_vcpu:dirty_ring_size是否有值,如果有值,就会调用kvm_dirty_ring_alloc分配kvm_dirty_ring:dirty_gfns的空间:
static int kvm_vm_ioctl_create_vcpu(struct kvm *kvm, u32 id)
{
    ...
	if (kvm->dirty_ring_size) {
		r = kvm_dirty_ring_alloc(&vcpu->dirty_ring,
					 id, kvm->dirty_ring_size);
		if (r)
			goto arch_vcpu_destroy;
	}
	...
}
int kvm_dirty_ring_alloc(struct kvm_dirty_ring *ring, int index, u32 size)
{
	ring->dirty_gfns = vzalloc(size);
	if (!ring->dirty_gfns)
		return -ENOMEM;

	ring->size = size / sizeof(struct kvm_dirty_gfn);
	ring->soft_limit = ring->size - kvm_dirty_ring_get_rsvd_entries();
	ring->dirty_index = 0;
	ring->reset_index = 0;
	ring->index = index;

	return 0;
}
以上就是kvm侧使用dirty ring对于脏页记录/处理的流程.
2.5. qemu侧记录/获取脏页流程
qemu侧对于dirty ring的支持,主要涉及下面一些补丁:
b4420f198dd8eab53cf6062c1871d0e5f5601e86 涉及dirty ring的基本支持 v6.1.0-rc0
2ea5cb0a47c9dbf78235de30a0d5846a4ab6d995 涉及dirty-ring-size参数接口方面的代码 v6.1.0-rc0
856e23a0fb92b0949eace7f43a521e0214246735 针对arm架构有一些微调 v8.1.0-rc0
在上节介绍kvm侧时,提到了用户态kvm要传入大于0的size,内核态kvm才会开启dirty ring功能.这在qemu的kvm_init函数中有所体现:
if (s->kvm_dirty_ring_size > 0) {
     uint64_t ring_bytes;

     ring_bytes = s->kvm_dirty_ring_size * sizeof(struct kvm_dirty_gfn);

     /* Read the max supported pages */
     ret = kvm_vm_check_extension(s, KVM_CAP_DIRTY_LOG_RING);
     if (ret > 0) {
         if (ring_bytes > ret) {
             error_report("KVM dirty ring size %" PRIu32 " too big "
                          "(maximum is %ld).  Please use a smaller value.",
                          s->kvm_dirty_ring_size,
                          (long)ret / sizeof(struct kvm_dirty_gfn));
             ret = -EINVAL;
             goto err;
         }

         ret = kvm_vm_enable_cap(s, KVM_CAP_DIRTY_LOG_RING, 0, ring_bytes);
         if (ret) {
             error_report("Enabling of KVM dirty ring failed: %s. "
                          "Suggested minimum value is 1024.", strerror(-ret));
             goto err;
         }

         s->kvm_dirty_ring_bytes = ring_bytes;
      } else {
          warn_report("KVM dirty ring not available, using bitmap method");
          s->kvm_dirty_ring_size = 0;
     }
 }
这里就可以看到使用KVM_CAP_DIRTY_LOG_RING cmd去调用ioctl,到了kvm就可以设置kvm:dirty_ring_size非0,这样内核态kvm相关的dirty ring的逻辑就可以运行起来.这里可以看到要想通过kvm_vm_enable_cap的KVM_CAP_DIRTY_LOG_RING到内核里去设置kvm:dirty_ring_size为非0,实际上是有两个条件,一是KVMState:kvm_dirty_ring_size要大于0,二是以KVM_CAP_DIRTY_LOG_RING cmd调用的kvm_vm_check_extension要大于0,这其实是从两个角度共同控制是否使用dirty ring功能.先说第一个条件,这是qemu(以及kvm)开给用户的选项能力控制dirty ring的开启.KVMState:kvm_dirty_ring_size在函数kvm_set_dirty_ring_size设置:
static void kvm_set_dirty_ring_size(Object *obj, Visitor *v,
                                    const char *name, void *opaque,
                                    Error **errp)
{
    ...
    s->kvm_dirty_ring_size = value;
}
kvm_set_dirty_ring_size作为dirty-ring-size这个属性的set函数被添加到ObjectClass:properties这个hash表里,在初始化的时候调用:
static void kvm_accel_class_init(ObjectClass *oc, void *data)
{
    ...
    object_class_property_add(oc, "dirty-ring-size", "uint32",
        kvm_get_dirty_ring_size, kvm_set_dirty_ring_size,
        NULL, NULL);
    ...
}
在介绍qemu选项的代码中(文件qemu-options.hx)可以看到如下对dirty-ring-size描述:
``dirty-ring-size=n``
     When the KVM accelerator is used, it controls the size of the per-vCPU
     dirty page ring buffer (number of entries for each vCPU). It should
     be a value that is power of two, and it should be 1024 or bigger (but
     still less than the maximum value that the kernel supports).  4096
     could be a good initial value if you have no idea which is the best.
     Set this value to 0 to disable the feature.  By default, this feature
     is disabled (dirty-ring-size=0).  When enabled, KVM will instead
     record dirty pages in a bitmap.
可以看到,要想使能dirty ring功能,必须将dirty-ring-size设置为非0,一种典型的设置:-accel kvm,dirty-ring-size=4096,目前找了个环境看了下没有显式的设置这个参数,所以目前621环境是没有使用起这个功能的.下面分析第二个控制开启dirty ring的选项:以KVM_CAP_DIRTY_LOG_RING cmd调用kvm_vm_check_extension要大于0.在kvm内核侧这个cmd的实现如下,实际是返回了内核目前支持的最大kvm_dirty_gfn条目数:
#if KVM_DIRTY_LOG_PAGE_OFFSET > 0
		return KVM_DIRTY_RING_MAX_ENTRIES * sizeof(struct kvm_dirty_gfn);
#else
		return 0;
/*
 * Arch needs to define the macro after implementing the dirty ring
 * feature.  KVM_DIRTY_LOG_PAGE_OFFSET should be defined as the
 * starting page offset of the dirty ring structures.
 */
#ifndef KVM_DIRTY_LOG_PAGE_OFFSET
#define KVM_DIRTY_LOG_PAGE_OFFSET 0
#endif
可以看到,arch要是支持了dirty ring功能,就会将KVM_DIRTY_LOG_PAGE_OFFSET设置为非0,比如x86将其实现为64.而arm64没有将其定义为大于0的值,而是使用include/uapi/linux/kvm.h里的默认值0,所以621的代码要想支持arm64的dirty ring,需要backport一些代码.这个宏其作用其实是将dirty ring从内核空间映射到用户态空间的偏移.
介绍完qemu侧对dirty ring开启的控制后,可以分析下qemu侧怎么记录/获取脏页的.
qemu里传统的采用dirty_bmap的方式是通过以下代码链完成从内核侧获取脏页信息到qemu用户态:
kvm_log_sync->kvm_physical_sync_dirty_bitmap->kvm_slot_get_dirty_log->kvm_vm_ioctl
最后的kvm_slot_get_dirty_log实现如下:
static bool kvm_slot_get_dirty_log(KVMState *s, KVMSlot *slot)
{
    struct kvm_dirty_log d = {};
    int ret;

    d.dirty_bitmap = slot->dirty_bmap;
    d.slot = slot->slot | (slot->as_id << 16);
    ret = kvm_vm_ioctl(s, KVM_GET_DIRTY_LOG, &d);

    if (ret == -ENOENT) {
        /* kernel does not have dirty bitmap in this slot */
        ret = 0;
    }
    if (ret) {
        error_report_once("%s: KVM_GET_DIRTY_LOG failed with %d",
                          __func__, ret);
    }
    return ret == 0;
}
使用KVM_GET_DIRTY_LOG这个命令调用到内核里,在内核里的处理,前面已经介绍过了.
上面简单介绍了下传统的dirty_bmap方式,下面主要还是介绍dirty ring的方式,这种方式在qemu的代码里通过以下调用链完成日志收集:
kvm_log_sync_global->kvm_dirty_ring_flush->kvm_dirty_ring_reap->kvm_dirty_ring_reap_locked->kvm_dirty_ring_reap_one->kvm_dirty_ring_mark_page
从kvm_log_sync_global再往上,qemu有两种手段/途径去同步内核的脏页信息,一种是在热迁移路径里现做,这种路径是kvm_log_sync_global作为log_sync_global回调函数而被调用,前面dirty bitmap的方式,使用函数kvm_log_sync其实也是作为log_sync回调函数而使用的,这两个回调钩子在如下函数代码里初始化:
void kvm_memory_listener_register(KVMState *s, KVMMemoryListener *kml,
                                  AddressSpace *as, int as_id, const char *name)
{
    ...
    if (s->kvm_dirty_ring_size) {
        kml->listener.log_sync_global = kvm_log_sync_global;
    } else {
        kml->listener.log_sync = kvm_log_sync;
        kml->listener.log_clear = kvm_log_clear;
    }
    ...
}
在这里也可以很清楚的看到,dirty bitmap和dirty ring在qemu的代码里走了不同的路径,kvm_dirty_ring_size怎么设置的前面已经详细分析过了.
dirty ring的第一种方式同步内核脏页信息是热迁移现做,这种方式的一个路径比如如下:
ram_init_bitmaps->migration_bitmap_sync_precopy->migration_bitmap_sync->memory_global_dirty_log_sync->
memory_region_sync_dirty_bitmap->log_sync_global(kvm_log_sync_global)->kvm_dirty_ring_flush->
kvm_dirty_ring_reap->kvm_dirty_ring_reap_locked->kvm_dirty_ring_reap_one->kvm_dirty_ring_mark_page
对于上面的函数调用链,这里介绍两点,一是ram_init_bitmaps函数里是先调用了memory_global_dirty_log_start再调用migration_bitmap_sync_precopy,也就是热迁移一开启脏页迁移后就做了一次从内核获取脏页信息的动作:
static void ram_init_bitmaps(RAMState *rs)
{
  ...
        if (!migrate_background_snapshot()) {
            memory_global_dirty_log_start(GLOBAL_DIRTY_MIGRATION);
            migration_bitmap_sync_precopy(rs);
        }
  ...
}
第二点是memory_region_sync_dirty_bitmap函数,这个函数屏蔽了dirty_bitmap和dirty ring方式的差异,从它向上的父函数是不知道底层这两种不同的实现方式的:
static void memory_region_sync_dirty_bitmap(MemoryRegion *mr)
{
        if (listener->log_sync) {
            ...
            listener->log_sync(listener, &mrs);//dirty_bitmap方式,kvm_log_sync
            ...
        } else if (listener->log_sync_global) {
            ...
            listener->log_sync_global(listener); //dirty ring方式,kvm_log_sync_global
            ...
        }
 }
dirty ring的第二种同步内核脏页信息的方式是通过一个线程在后台每隔1s做一次:
kvm_dirty_ring_reaper_thread->
kvm_dirty_ring_reap->kvm_dirty_ring_reap_locked->kvm_dirty_ring_reap_one->kvm_dirty_ring_mark_page
上面的调用链第二行和前面的第一种同步脏页信息的路径最后一行是一样的,只有最前面的kvm_dirty_ring_reaper_thread这时是通过创建一个线程来做同步:
static int kvm_dirty_ring_reaper_init(KVMState *s)
{
    struct KVMDirtyRingReaper *r = &s->reaper;

    qemu_thread_create(&r->reaper_thr, "kvm-reaper",
                       kvm_dirty_ring_reaper_thread,
                       s, QEMU_THREAD_JOINABLE);

    return 0;
}

static void *kvm_dirty_ring_reaper_thread(void *data)
{
      ...
      while (true) {
        r->reaper_state = KVM_DIRTY_RING_REAPER_WAIT;
        trace_kvm_dirty_ring_reaper("wait");
        /*
         * TODO: provide a smarter timeout rather than a constant?
         */
        sleep(1);

        trace_kvm_dirty_ring_reaper("wakeup");
        r->reaper_state = KVM_DIRTY_RING_REAPER_REAPING;

        qemu_mutex_lock_iothread();
        kvm_dirty_ring_reap(s);
        qemu_mutex_unlock_iothread();

        r->reaper_iteration++;
    }
    ...
}
可以看到这个后台定期1s同步脏页信息的线程叫kvm-reaper.
分析完了qemu使用dirty ring的两种同步脏页信息的路径,下面可以具体看下qemu将脏页信息又搬到了哪里,先看kvm_dirty_ring_reap_one函数:
static uint32_t kvm_dirty_ring_reap_one(KVMState *s, CPUState *cpu)
{
    struct kvm_dirty_gfn *dirty_gfns = cpu->kvm_dirty_gfns, *cur;
    uint32_t ring_size = s->kvm_dirty_ring_size;
    uint32_t count = 0, fetch = cpu->kvm_fetch_index;

    assert(dirty_gfns && ring_size);
    trace_kvm_dirty_ring_reap_vcpu(cpu->cpu_index);

    while (true) {
        cur = &dirty_gfns[fetch % ring_size];
        if (!dirty_gfn_is_dirtied(cur)) {
            break;
        }
        kvm_dirty_ring_mark_page(s, cur->slot >> 16, cur->slot & 0xffff,
                                 cur->offset);
        dirty_gfn_set_collected(cur);
        trace_kvm_dirty_ring_page(cpu->cpu_index, fetch, cur->offset);
        fetch++;
        count++;
    }
    cpu->kvm_fetch_index = fetch;
    cpu->dirty_pages += count;

    return count;
}
这个函数从CPUState:kvm_dirty_gfns里取出脏页信息,kvm_dirty_gfn前面的分析提到过,它是内核和qemu都认识的一个结构体,然后在while循环里针对所有设置了KVM_DIRTY_GFN_F_DIRTY标志的kvm_dirty_gfn去调用kvm_dirty_ring_mark_page函数:
static bool dirty_gfn_is_dirtied(struct kvm_dirty_gfn *gfn)
{
    return gfn->flags == KVM_DIRTY_GFN_F_DIRTY;
}
kvm_dirty_ring_mark_page函数里将脏页信息又转移到了KVMSlot:dirty_bmap:
static void kvm_dirty_ring_mark_page(KVMState *s, uint32_t as_id,
                                     uint32_t slot_id, uint64_t offset)
{
    KVMMemoryListener *kml;
    KVMSlot *mem;

    if (as_id >= s->nr_as) {
        return;
    }

    kml = s->as[as_id].ml;
    mem = &kml->slots[slot_id];

    if (!mem->memory_size || offset >=
        (mem->memory_size / qemu_real_host_page_size)) {
        return;
    }

    set_bit(offset, mem->dirty_bmap);
}
先通过as_id找到AddressSpace,再通过slot_id找到是哪个KVMSlot,最后将KVMSlot:dirty_bmap对应offset的位置1,代表对应的这个页面被写过.kvm_dirty_ring_reap_one调用完kvm_dirty_ring_mark_page将脏信息转移到KVMSlot:dirty_bmap后,又调用dirty_gfn_set_collected将对应的kvm_dirty_gfn:flags设置为KVM_DIRTY_GFN_F_RESET,表示我qemu作为consumer,已经使用了脏页信息了,你kvm(内核)作为producer可以清除这个脏信息了,但是发起清除的这个请求由qemu来做,只是kvm执行这个动作,在kvm_dirty_ring_reap_one搜集转移了脏信息后,它的父函数kvm_dirty_ring_reap_locked就可以调用KVM_RESET_DIRTY_RINGS这个cmd的ioctl请求了:
static uint64_t kvm_dirty_ring_reap_locked(KVMState *s)
{
    ...
    CPU_FOREACH(cpu) {
        total += kvm_dirty_ring_reap_one(s, cpu);
    }

    if (total) {
        ret = kvm_vm_ioctl(s, KVM_RESET_DIRTY_RINGS);
        assert(ret == total);
    }
    ...
}
在内核kvm侧,处理KVM_RESET_DIRTY_RINGS这个ioctl请求是kvm_vm_ioctl_reset_dirty_pages函数:
static int kvm_vm_ioctl_reset_dirty_pages(struct kvm *kvm)
{
    ...
	kvm_for_each_vcpu(i, vcpu, kvm)
		cleared += kvm_dirty_ring_reset(vcpu->kvm, &vcpu->dirty_ring);
	...
}
而在kvm_dirty_ring_reset函数里会检查kvm_dirty_gfn:flags是否是KVM_DIRTY_GFN_F_RESET,如果是就调用kvm_dirty_gfn_set_invalid将kvm_dirty_gfn:flags设置为0,表示这个脏信息已经被用户态回收过了:
int kvm_dirty_ring_reset(struct kvm *kvm, struct kvm_dirty_ring *ring)
{
    ...
	while (true) {
		entry = &ring->dirty_gfns[ring->reset_index & (ring->size - 1)];

		if (!kvm_dirty_gfn_harvested(entry))
			break;

		next_slot = READ_ONCE(entry->slot);
		next_offset = READ_ONCE(entry->offset);

		/* Update the flags to reflect that this GFN is reset */
		kvm_dirty_gfn_set_invalid(entry);
		...
	}
}

static inline void kvm_dirty_gfn_set_invalid(struct kvm_dirty_gfn *gfn)
{
	gfn->flags = 0;
}
注意这里用户态/内核态的同步逻辑,内核侧写脏时,根据前面层的分析,其直接调用kvm_dirty_gfn_set_dirtied而没有判断之前的状态,因为之前无非就是非脏/脏两种,将非脏变成脏,正是记录了guest对gfn的访问,将脏变成脏也不会丢失脏信息没什么问题.而内核侧需要将flags变成0表示invalid状态时,需要检查其之前是不是KVM_DIRTY_GFN_F_RESET,这个flags的值只有用户态自己回收了脏信息,才会设置,这样避免脏信息丢失.这里也展示了前面层提到的简单状态机.
以上的分析都是说用户态直接拿来信息用便是,但是这个通路究竟怎么联系起来的,前面层分析传统的dirty_bitmap方式,有介绍到传统的方式是copy_to_user这种内核态/用户态间相互拷贝.但是dirty ring是mmap的方式,之前的层分析过了,kvm_dirty_ring:dirty_gfns是在内核虚拟空间通过vzalloc得到的,而在qemu里,创建完vcpu后通过kvm_init_vcpu初始化vcpu时,有以下代码:
int kvm_init_vcpu(CPUState *cpu, Error **errp)
{
    ...
    if (s->kvm_dirty_ring_size) {
        /* Use MAP_SHARED to share pages with the kernel */
        cpu->kvm_dirty_gfns = mmap(NULL, s->kvm_dirty_ring_bytes,
                                   PROT_READ | PROT_WRITE, MAP_SHARED,
                                   cpu->kvm_fd,
                                   PAGE_SIZE * KVM_DIRTY_LOG_PAGE_OFFSET);
        if (cpu->kvm_dirty_gfns == MAP_FAILED) {
            ret = -errno;
            DPRINTF("mmap'ing vcpu dirty gfns failed: %d\n", ret);
            goto err;
        }
    }
    ...
}
也就是说,用户态对cpu->kvm_fd所指的文件(代表了vcpu,内核抽象出来的fd供用户态操作vcpu)偏移PAGE_SIZE * KVM_DIRTY_LOG_PAGE_OFFSET处的内容映射到了其用户态虚拟空间.这个mmap函数会通过cpu->kvm_fd参数找到内核里对应这个文件fops即kvm_vcpu_fops:
static struct file_operations kvm_vcpu_fops = {
	.release        = kvm_vcpu_release,
	.unlocked_ioctl = kvm_vcpu_ioctl,
	.mmap           = kvm_vcpu_mmap,
	.llseek		= noop_llseek,
	KVM_COMPAT(kvm_vcpu_compat_ioctl),
};
可以看到,这里设置了mmap回调为kvm_vcpu_mmap,通过如下调用链用户态的mmap系统调用最终会来到这个kvm_vcpu_mmap函数:
SYSCALL_DEFINE6(mmap_pgoff...)->ksys_mmap_pgoff->vm_mmap_pgoff->do_mmap_pgoff->do_mmap->mmap_region->call_mmap: return file->f_op->mmap(file, vma);
kvm_vcpu_mmap函数的逻辑很简单,在做了一些合法性判断后,就将vma的vm_ops设置为kvm_vcpu_vm_ops了,这个vm_ops里也很简单,只实现了fault回调函数为kvm_vcpu_fault:
static const struct vm_operations_struct kvm_vcpu_vm_ops = {
	.fault = kvm_vcpu_fault,
};

static int kvm_vcpu_mmap(struct file *file, struct vm_area_struct *vma)
{
	struct kvm_vcpu *vcpu = file->private_data;
	unsigned long pages = (vma->vm_end - vma->vm_start) >> PAGE_SHIFT;

	if ((kvm_page_in_dirty_ring(vcpu->kvm, vma->vm_pgoff) ||
	     kvm_page_in_dirty_ring(vcpu->kvm, vma->vm_pgoff + pages - 1)) &&
	    ((vma->vm_flags & VM_EXEC) || !(vma->vm_flags & VM_SHARED)))
		return -EINVAL;

	vma->vm_ops = &kvm_vcpu_vm_ops;
	return 0;
}
然后用户态访问这个映射的dirty ring时缺页异常里有:
...->handle_mm_fault->__handle_mm_fault->handle_pte_fault->do_fault->do_read_fault->__do_fault: ret = vma->vm_ops->fault(vmf);
最终会来到kvm_vcpu_fault这个fault函数,在这个函数里主要是判断访问的偏移落在了哪个范围,不同的范围得到不同的page,然后给到vmf->page,这样回到缺页的公共流程里,填充页表,下一次访问时就是dirty ring的内容了:
static vm_fault_t kvm_vcpu_fault(struct vm_fault *vmf)
{
	struct kvm_vcpu *vcpu = vmf->vma->vm_file->private_data;
	struct page *page;

	if (vmf->pgoff == 0)
		page = virt_to_page(vcpu->run);
#ifdef CONFIG_X86
	else if (vmf->pgoff == KVM_PIO_PAGE_OFFSET)
		page = virt_to_page(vcpu->arch.pio_data);
#endif
#ifdef CONFIG_KVM_MMIO
	else if (vmf->pgoff == KVM_COALESCED_MMIO_PAGE_OFFSET)
		page = virt_to_page(vcpu->kvm->coalesced_mmio_ring);
#endif
	else if (kvm_page_in_dirty_ring(vcpu->kvm, vmf->pgoff))
		page = kvm_dirty_ring_get_page(
		    &vcpu->dirty_ring,
		    vmf->pgoff - KVM_DIRTY_LOG_PAGE_OFFSET);
	else
		return kvm_arch_vcpu_fault(vcpu, vmf);
	get_page(page);
	vmf->page = page;
	return 0;
}
注意最后的kvm_dirty_ring_get_page里使用了vmalloc_to_page,因为当时在kvm里分配这段空间时使用的就是vzalloc,属于内核的vmalloc虚拟空间.
在即将结束"脏页跟踪机制"这节时,最后想分析下qemu代码里脏页信息的流转过程,这个过程涉及到qemu里虚拟机热迁移的整体流程,从脏页信息流转的角度切入这个虚拟机热迁移过程,以为其它节介绍虚拟机热迁移开出一个引子.
在前面已经介绍到,内核的脏页信息在kvm_dirty_ring_reap_one->kvm_dirty_ring_mark_page这个函数里被转移到了KVMSlot:dirty_bmap里,其实这个流程是处于一个更长的虚拟机迁移流程里:
migration_thread->migration_iteration_run->qemu_savevm_state_pending->save_live_pending(ram_save_pending)->migration_bitmap_sync_precopy
->migration_bitmap_sync->memory_global_dirty_log_sync->memory_region_sync_dirty_bitmap->log_sync_global(kvm_log_sync_global)
->kvm_dirty_ring_flush->kvm_dirty_ring_reap->kvm_dirty_ring_reap_locked->kvm_dirty_ring_reap_one->kvm_dirty_ring_mark_page
从内核里拿到脏页信息并转移到KVMSlot:dirty_bmap:
set_bit(offset, mem->dirty_bmap);
后又有流程:
migration_thread->migration_iteration_run->qemu_savevm_state_pending->save_live_pending(ram_save_pending)->migration_bitmap_sync_precopy
->migration_bitmap_sync->memory_global_dirty_log_sync->memory_region_sync_dirty_bitmap->log_sync_global(kvm_log_sync_global)
->kvm_slot_sync_dirty_pages->cpu_physical_memory_set_dirty_lebitmap
将脏页信息转移到了ram_list.dirty_memory全局脏页信息表里:
static inline void cpu_physical_memory_set_dirty_lebitmap(unsigned long *bitmap,
                                                          ram_addr_t start,
                                                          ram_addr_t pages)
{
            ...
            for (i = 0; i < DIRTY_MEMORY_NUM; i++) {
                blocks[i] =
                    qatomic_rcu_read(&ram_list.dirty_memory[i])->blocks;
            }

            for (k = 0; k < nr; k++) {
                if (bitmap[k]) {
                    unsigned long temp = leul_to_cpu(bitmap[k]);

                    qatomic_or(&blocks[DIRTY_MEMORY_VGA][idx][offset], temp);

                    if (global_dirty_tracking) {
                        qatomic_or(
                                &blocks[DIRTY_MEMORY_MIGRATION][idx][offset],
                                temp);
                        if (unlikely(
                            global_dirty_tracking & GLOBAL_DIRTY_DIRTY_RATE)) {
                            total_dirty_pages += ctpopl(temp);
                        }
                    }

                    if (tcg_enabled()) {
                        qatomic_or(&blocks[DIRTY_MEMORY_CODE][idx][offset],
                                   temp);
                    }
                }
                ...
}
随后又有流程:
migration_thread->migration_iteration_run->qemu_savevm_state_pending->save_live_pending(ram_save_pending)->migration_bitmap_sync_precopy
->migration_bitmap_sync->ramblock_sync_dirty_bitmap->cpu_physical_memory_sync_dirty_bitmap
将上面全局的bitmap信息又转移到了每RAMBlock:bmap里:
static inline
uint64_t cpu_physical_memory_sync_dirty_bitmap(RAMBlock *rb,
                                               ram_addr_t start,
                                               ram_addr_t length)
{
    ...
    unsigned long *dest = rb->bmap;
    ...
        src = qatomic_rcu_read(
                &ram_list.dirty_memory[DIRTY_MEMORY_MIGRATION])->blocks;

        for (k = page; k < page + nr; k++) {
            if (src[idx][offset]) {
                unsigned long bits = qatomic_xchg(&src[idx][offset], 0);
                unsigned long new_dirty;
                new_dirty = ~dest[k];
                dest[k] |= bits;
                new_dirty &= bits;
                num_dirty += ctpopl(new_dirty);
            }
    ...
}
最后迁移发送内存的流程,使用的是最后的RAMBlock:bmap里的脏页信息,比如这样的一个路径:
migration_thread->migration_iteration_run
->qemu_savevm_state_iterate->save_live_iterate(ram_save_iterate)->ram_find_and_save_block->find_dirty_block->migration_bitmap_find_dirty
最后的migration_bitmap_find_dirty就是使用RAMBlock:bmap的信息来查询脏页信息,决定只发送脏页:
static inline
unsigned long migration_bitmap_find_dirty(RAMState *rs, RAMBlock *rb,
                                          unsigned long start)
{
    unsigned long size = rb->used_length >> TARGET_PAGE_BITS;
    unsigned long *bitmap = rb->bmap;

    if (ramblock_is_ignored(rb)) {
        return size;
    }

    return find_next_bit(bitmap, size, start);
}
找到脏页后ram_find_and_save_block->ram_save_host_page函数去发送脏页面,这样整个脏页从内核态如何到用户态,用户态qemu又如何转移脏页信息,以及最后在哪里使用的就都清楚了.
以上就是"脏页跟踪机制"的全部流程,后续还要介绍qemu里虚拟机的迁移流程.
3. 迁移第一阶段
前面的层有提到libvirt使用qmp方式使得dst端开启还原流程,那么在src端其实是类似的,libvrit的如下代码流程会使用migrate json命令使得qemu进入到发送虚拟机的流程里:
qemuMigrationSrcRun->qemuMigrationSrcStart->qemuMonitorMigrateToSocket->qemuMonitorJSONMigrate
qemuMonitorJSONMigrate函数使用migrate串构造命令发送给qemu进程进行处理:
...
g_autoptr(virJSONValue) cmd = qemuMonitorJSONMakeCommand("migrate",
                                                         "b:detach", true,
                                                         "b:resume", resume,
                                                         "s:uri", uri,
                                                         NULL);

...
前面介绍过,这个命令最后对应的qemu里的处理函数就是qmp_migrate.在qemu代码的qapi/migration.json文件里有关于这个命令的描述:
##
# @migrate:
#
# Migrates the current running guest to another Virtual Machine.
#
# @uri: the Uniform Resource Identifier of the destination VM
#
# @blk: do block migration (full disk copy)
#
# @inc: incremental disk copy migration
#
# @detach: this argument exists only for compatibility reasons and
#          is ignored by QEMU
#
# @resume: resume one paused migration, default "off". (since 3.0)
#
# Returns: nothing on success
#
# Since: 0.14
#
# Notes:
#
# 1. The 'query-migrate' command should be used to check migration's progress
#    and final result (this information is provided by the 'status' member)
#
# 2. All boolean arguments default to false
#
# 3. The user Monitor's "detach" argument is invalid in QMP and should not
#    be used
#
# Example:
#
# -> { "execute": "migrate", "arguments": { "uri": "tcp:0:4446" } }
# <- { "return": {} }
#
##
{ 'command': 'migrate',
  'data': {'uri': 'str', '*blk': 'bool', '*inc': 'bool',
           '*detach': 'bool', '*resume': 'bool' } }
从这个例子可以看到使用的是tcp的网络方式(uri参数会指明使用什么通道去传递虚拟机数据),那么在qmp_migrate里就会走socket网络的方式,其它方式还有rdma,本文主要关注tcp网络的方式.tcp网络方式就是qmp_migrate->socket_start_outgoing_migration:
void qmp_migrate(const char *uri, bool has_blk, bool blk,
                 bool has_inc, bool inc, bool has_detach, bool detach,
                 bool has_resume, bool resume, Error **errp)
{
    ...
    if (strstart(uri, "tcp:", &p) ||
        strstart(uri, "unix:", NULL) ||
        strstart(uri, "vsock:", NULL)) {
        migrate_protocol_allow_multifd(true);
        socket_start_outgoing_migration(s, p ? p : uri, &local_err);
#ifdef CONFIG_RDMA
    } else if (strstart(uri, "rdma:", &p)) {
        rdma_start_outgoing_migration(s, p, &local_err);
#endif
    ...
}
socket_start_outgoing_migration里就是简单的调用socket_start_outgoing_migration_internal,而在socket_start_outgoing_migration_internal函数里:
socket_start_outgoing_migration_internal(MigrationState *s,
                                         SocketAddress *saddr,
                                         Error **errp)
{
    ...
    qio_channel_socket_connect_async(sioc,
                                     saddr,
                                     socket_outgoing_migration,
                                     data,
                                     socket_connect_data_free,
                                     NULL);

    ...
}
可以看到socket_outgoing_migration是一个回调函数,它作为qio_channel_socket_connect_async函数调用的第三个参数,随着后面的分析,可以看到socket_outgoing_migration函数正是真正执行虚拟机发送的函数,继续看qio_channel_socket_connect_async函数:
void qio_channel_socket_connect_async(QIOChannelSocket *ioc,
                                      SocketAddress *addr,
                                      QIOTaskFunc callback,
                                      gpointer opaque,
                                      GDestroyNotify destroy,
                                      GMainContext *context)
{
    QIOTask *task = qio_task_new(
        OBJECT(ioc), callback, opaque, destroy);
    SocketAddress *addrCopy;

    addrCopy = QAPI_CLONE(SocketAddress, addr);

    /* socket_connect() does a non-blocking connect(), but it
     * still blocks in DNS lookups, so we must use a thread */
    trace_qio_channel_socket_connect_async(ioc, addr);
    qio_task_run_in_thread(task,
                           qio_channel_socket_connect_worker,
                           addrCopy,
                           (GDestroyNotify)qapi_free_SocketAddress,
                           context);
}
这里需要关注callback(socket_outgoing_migration)的去向,因为这涉及到到底在哪执行的它,在qio_task_new里可以看到callback(socket_outgoing_migration)给到了task->func:
QIOTask *qio_task_new(Object *source,
                      QIOTaskFunc func,
                      gpointer opaque,
                      GDestroyNotify destroy)
{
    ...
    task->func = func;
    ...
}
继续看qio_channel_socket_connect_async后面的代码,由于socket_connect里会有DNS查询,这可能会长时间block住,所以连接操作在qio_task_run_in_thread里另开线程来做:
void qio_task_run_in_thread(QIOTask *task,
                            QIOTaskWorker worker,
                            gpointer opaque,
                            GDestroyNotify destroy,
                            GMainContext *context)
{
    struct QIOTaskThreadData *data = g_new0(struct QIOTaskThreadData, 1);
    QemuThread thread;

    if (context) {
        g_main_context_ref(context);
    }

    data->worker = worker;
    data->opaque = opaque;
    data->destroy = destroy;
    data->context = context;

    task->thread = data;

    trace_qio_task_thread_start(task, worker, opaque);
    qemu_thread_create(&thread,
                       "io-task-worker",
                       qio_task_thread_worker,
                       task,
                       QEMU_THREAD_DETACHED);
}
在这个函数里,将新开线程要执行的函数放到了task->thread->worker(也就是qio_channel_socket_connect_worker函数),qemu_thread_create一旦创建新的线程后,其执行的起点函数就是qio_task_thread_worker:
static gpointer qio_task_thread_worker(gpointer opaque)
{
    QIOTask *task = opaque;

    trace_qio_task_thread_run(task);

    task->thread->worker(task, task->thread->opaque);

    /* We're running in the background thread, and must only
     * ever report the task results in the main event loop
     * thread. So we schedule an idle callback to report
     * the worker results
     */
    trace_qio_task_thread_exit(task);

    qemu_mutex_lock(&task->thread_lock);

    task->thread->completion = g_idle_source_new();
    g_source_set_callback(task->thread->completion,
                          qio_task_thread_result, task, NULL);
    g_source_attach(task->thread->completion,
                    task->thread->context);
    g_source_unref(task->thread->completion);
    trace_qio_task_thread_source_attach(task, task->thread->completion);

    qemu_cond_signal(&task->thread_cond);
    qemu_mutex_unlock(&task->thread_lock);

    return NULL;
}
从这个函数可以看到,首先task->thread->worker(qio_channel_socket_connect_worker)->qio_channel_socket_connect_sync->socket_connect会完成和对端(dst)的连接,然后创建了一个idle source,其回调函数是qio_task_thread_result,关联的参数是task,task->func是前面关注过的socket_outgoing_migration函数,通过qio_task_thread_result->qio_task_complete会完成对socket_outgoing_migration的调用:
void qio_task_complete(QIOTask *task)
{
    task->func(task, task->opaque);
    trace_qio_task_complete(task);
    qio_task_free(task);
}
那么qio_task_thread_result自身是怎么调用起来的呢,这涉及到glib GMainLoop事件驱动模型和qemu主循环,过多的细节不是本文的主题,只简单介绍下,在qio_task_thread_worker函数里,创建glib的idle completion(g_idle_source_new函数),completion事件用于确保连接完成后,回调qio_task_thread_result在主线程执行,实现手段是通过g_source_attach将这个事件加到默认的GMainContext(通常是主线程的GMainLoop)。然后在qemu_main_loop->main_loop_wait->os_host_main_loop_wait中会轮询并调用起qio_task_thread_result这个回调函数:
if (g_poll_ret > 0) {
    for (i = 0; i < w->num; i++) {
        w->revents[i] = poll_fds[n_poll_fds + i].revents;
    }
    for (i = 0; i < w->num; i++) {
        if (w->revents[i] && w->func[i]) {
            w->func[i](w->opaque[i]);
        }
    }
}
通过异步的方式将连接创建好后,后面就可以关注socket_outgoing_migration函数开始传输虚拟机的工作了.socket_outgoing_migration->migration_channel_connect->migrate_fd_connect里会创建一个名为live_migration的热迁移线程,其回调执行函数是migration_thread,下面又继续从这个函数切入分析发送虚拟机的逻辑,也就是本节正式的主题:迁移发送的第一阶段.
migration_thread->qemu_savevm_state_setup里面会统一处理虚拟机热迁移的第一阶段.
所有需要热迁移的模块,都需要提供一个SaveVMHandlers的结构体,调用register_savevm_live函数,去分配一个SaveStateEntry,并将SaveVMHandlers给到SaveStateEntry里的SaveVMHandlers类型的ops,SaveVMHandlers里就定义了迁移各个阶段需要调用的函数,比如对于内存模块(内存肯定需要迁移),如下函数调用使用savevm_ram_handlers作为参数去分配注册一个SaveStateEntry,并通过savevm_state_handler_insert插入到savevm_state.handlers里:
void ram_mig_init(void)
{
    qemu_mutex_init(&XBZRLE.lock);
    register_savevm_live("ram", 0, 4, &savevm_ram_handlers, &ram_state);
    ram_block_notifier_add(&ram_mig_ram_notifier);
}
savevm_ram_handlers的定义如下:
static SaveVMHandlers savevm_ram_handlers = {
    .save_setup = ram_save_setup,
    .save_live_iterate = ram_save_iterate,
    .save_live_complete_postcopy = ram_save_complete,
    .save_live_complete_precopy = ram_save_complete,
    .has_postcopy = ram_has_postcopy,
    .save_live_pending = ram_save_pending,
    .load_state = ram_load,
    .save_cleanup = ram_save_cleanup,
    .load_setup = ram_load_setup,
    .load_cleanup = ram_load_cleanup,
    .resume_prepare = ram_resume_prepare,
};
这些回调函数里,save_setup就是迁移第一阶段需要调用的函数,save_live_iterate就是迁移第二阶段迭代发送阶段需要调用的函数,并且在dst端还原内存时又会调用到load_state,这个流程前面的节有介绍.
有了上面的注册逻辑,再来看上面提到的migration_thread->qemu_savevm_state_setup处理的第一阶段的逻辑:
void qemu_savevm_state_setup(QEMUFile *f)
{
    SaveStateEntry *se;
    Error *local_err = NULL;
    int ret;

    trace_savevm_state_setup();
    QTAILQ_FOREACH(se, &savevm_state.handlers, entry) {
        if (!se->ops || !se->ops->save_setup) {
            continue;
        }
        if (se->ops->is_active) {
            if (!se->ops->is_active(se->opaque)) {
                continue;
            }
        }
        save_section_header(f, se, QEMU_VM_SECTION_START);

        ret = se->ops->save_setup(f, se->opaque);
        save_section_footer(f, se);
        if (ret < 0) {
            qemu_file_set_error(f, ret);
            break;
        }
    }

    if (precopy_notify(PRECOPY_NOTIFY_SETUP, &local_err)) {
        error_report_err(local_err);
    }
}
在这里可以很清楚的看到,通过QTAILQ_FOREACH去遍历所有注册到savevm_state.handlers上的SaveStateEntry,并调用对应的save_setup函数,去做一些对应模块迁移前的准备工作,是为第一阶段,这里目前主要关注内存模块的save_setup函数也就是ram_save_setup的实现,它主要干了两件事情,一是分配并初始化记录脏页信息的bitmap,二是将可迁移的RAMBlock的一些信息比如idstr串,used_length等先传到dst端,下面分析这个函数,ram_save_setup->ram_init_all里分配并初始化了记录脏页的bitmap图:
static int ram_init_all(RAMState **rsp)
{
    if (ram_state_init(rsp)) {
        return -1;
    }

    if (xbzrle_init()) {
        ram_state_cleanup(rsp);
        return -1;
    }

    ram_init_bitmaps(*rsp);

    return 0;
}
xbzrle主要是用于内存压缩发送,可以减低某些workload的内存发送总量,这里不做详细介绍,留待其它节.ram_state_init里主要功能是算了下总的RAMBlock.used_length的长度并给到RAMState.migration_dirty_pages:
static int ram_state_init(RAMState **rsp)
{
    ...
    /*
     * Count the total number of pages used by ram blocks not including any
     * gaps due to alignment or unplugs.
     * This must match with the initial values of dirty bitmap.
     */
    (*rsp)->migration_dirty_pages = ram_bytes_total() >> TARGET_PAGE_BITS;
    ...
}
分配bitmap主要是在ram_init_all->ram_init_bitmaps里:
static void ram_init_bitmaps(RAMState *rs)
{
    /* For memory_global_dirty_log_start below.  */
    qemu_mutex_lock_iothread();
    qemu_mutex_lock_ramlist();

    WITH_RCU_READ_LOCK_GUARD() {
        ram_list_init_bitmaps();
        /* We don't use dirty log with background snapshots */
        if (!migrate_background_snapshot()) {
            memory_global_dirty_log_start(GLOBAL_DIRTY_MIGRATION);
            migration_bitmap_sync_precopy(rs);
        }
    }
    qemu_mutex_unlock_ramlist();
    qemu_mutex_unlock_iothread();

    /*
     * After an eventual first bitmap sync, fixup the initial bitmap
     * containing all 1s to exclude any discarded pages from migration.
     */
    migration_bitmap_clear_discarded_pages(rs);
}
ram_init_bitmaps->ram_list_init_bitmaps去分配每个RAMBlock用的bmap,随后通过memory_global_dirty_log_start开启了脏页记录,这个详细过程在前面的脏页跟踪机制有详细的分析,再往后调用migration_bitmap_sync_precopy做了一次脏页信息同步,这点前面的节也详细分析过了.只不过migration_bitmap_sync_precopy->migration_bitmap_sync里有关于cpu节流的逻辑,这块逻辑限于本节篇幅,留到第二阶段的节去分析,因为做节流的机会不仅是在第一阶段可以做,在第二阶段传送虚拟机数据时也会做.
后面继续看下ram_list_init_bitmaps里分配bmap的逻辑:
static void ram_list_init_bitmaps(void)
{
    ...
    RAMBlock *block;
    ...
            RAMBLOCK_FOREACH_NOT_IGNORED(block) {
            pages = block->max_length >> TARGET_PAGE_BITS;
            /*
             * The initial dirty bitmap for migration must be set with all
             * ones to make sure we'll migrate every guest RAM page to
             * destination.
             * Here we set RAMBlock.bmap all to 1 because when rebegin a
             * new migration after a failed migration, ram_list.
             * dirty_memory[DIRTY_MEMORY_MIGRATION] don't include the whole
             * guest memory.
             */
            block->bmap = bitmap_new(pages);
            bitmap_set(block->bmap, 0, pages);
            block->clear_bmap_shift = shift;
            block->clear_bmap = bitmap_new(clear_bmap_size(pages, shift));
        }
}
这里可以看到使用bitmap_new分配了bitmap所使用的空间,同时使用bitmap_set将里面的位全部设置为1,也就是初始时所有guest的页都要发送到dst.
在第一阶段的最后,分析下前面提到的ram_save_setup函数的第二部分,将可迁移RAMBlock的一些信息比如idstr串,used_length等先传到dst端,并借此契机看下qemu里发送数据的简单流程:
static int ram_save_setup(QEMUFile *f, void *opaque)
{
      RAMBlock *block;
      ...
      WITH_RCU_READ_LOCK_GUARD() {
        qemu_put_be64(f, ram_bytes_total_common(true) | RAM_SAVE_FLAG_MEM_SIZE);

        RAMBLOCK_FOREACH_MIGRATABLE(block) {
            qemu_put_byte(f, strlen(block->idstr));
            qemu_put_buffer(f, (uint8_t *)block->idstr, strlen(block->idstr));
            qemu_put_be64(f, block->used_length);
            if (migrate_postcopy_ram() && block->page_size !=
                                          qemu_host_page_size) {
                qemu_put_be64(f, block->page_size);
            }
            if (migrate_ignore_shared()) {
                qemu_put_be64(f, block->mr->addr);
            }
        }
    }
    ...
    qemu_fflush(f)
}
qemu_put*类的接口实际就是在网f->buf里存放数据并添加到iov里,参数f的类型是QEMUFile,这个是qemu里抽象出来表示数据传送的两端,具体和网络socket肯定有一个关联过程,本文不详述.总之在qemu_put*类的接口填好数据,在合适的时机(比如buffer填满)会将数据通过qemu_fflush函数发送出去,以下是一个调用路径:
qemu_fflush->writev_buffer(channel_writev_buffer)->qio_channel_writev->qio_channel_writev_full->
io_writev(qio_channel_socket_writev/qio_channel_rdma_writev)->sendmsg
在最后可以看到套接字接口sendmsg了.
以上,就是热迁移第一阶段的工作.
4. 迁移第二阶段
第二阶段主要是迭代发送src端的虚拟机状态给dst,其实现函数主要是migration_iteration_run,在migration_thread里调用它:
static void *migration_thread(void *opaque)
{
    ...
    while (migration_is_active(s)) {
        if (urgent || !qemu_file_rate_limit(s->to_dst_file)) {
            MigIterateState iter_state = migration_iteration_run(s);
            if (iter_state == MIG_ITERATE_SKIP) {
                continue;
            } else if (iter_state == MIG_ITERATE_BREAK) {
                break;
            }
        }

        /*
         * Try to detect any kind of failures, and see whether we
         * should stop the migration now.
         */
        thr_error = migration_detect_error(s);
        if (thr_error == MIG_THR_ERR_FATAL) {
            /* Stop migration */
            break;
        } else if (thr_error == MIG_THR_ERR_RECOVERED) {
            /*
             * Just recovered from a e.g. network failure, reset all
             * the local variables. This is important to avoid
             * breaking transferred_bytes and bandwidth calculation
             */
            update_iteration_initial_status(s);
        }

        urgent = migration_rate_limit();
    }
    ...
}
可以看到当migration_iteration_run返回的状态为MIG_ITERATE_BREAK时,就可以退出迭代发送的阶段,进入第三阶段,这是数据正常发送导致的break的情况.但是退出while循环的迭代发送还可能有其它条件,一个是migration_is_active函数:
bool migration_is_active(MigrationState *s)
{
    return (s->state == MIGRATION_STATUS_ACTIVE ||
            s->state == MIGRATION_STATUS_POSTCOPY_ACTIVE);
}
这个大的条件要求迁移状态是MIGRATION_STATUS_ACTIVE,这在migration_thread->migration_iteration_run之前通过migration_thread->qemu_savevm_wait_unplug已经设置了,一般是满足的.再一个条件是发生有urgent的事情,也可以使得进入migration_iteration_run进行迭代发送,或者qemu_file_rate_limit返回0(判断出过去的一次传输没有超过速率限制)也可以再次进入迭代发送,这里主要想分析下qemu_file_rate_limit判断,假如热迁移因为带宽不足而失败时,其调整原理就是来自这里的分析,qemu_file_rate_limit实现如下:
int qemu_file_rate_limit(QEMUFile *f)
{
    if (f->shutdown) {
        return 1;
    }
    if (qemu_file_get_error(f)) {
        return 1;
    }
    if (f->xfer_limit > 0 && f->bytes_xfer > f->xfer_limit) {
        return 1;
    }
    return 0;
}
可以看到,当传送的bytes_xfer大于xfer_limit时,就会返回1导致进不了迭代发送,bytes_xfer会在会在qemu_put*类的接口增加,而在每一轮迭代发送结束由以下路径:
migration_thread->migration_rate_limit->migration_update_counters->qemu_file_reset_rate_limit
或者在一轮迭代发送时有成功发送页面时通过如下路径:
migration_thread->migration_iteration_run->qemu_savevm_state_iterate(save_live_iterate)->ram_save_iterate->ram_find_and_save_block->ram_save_host_page->
migration_rate_limit->migration_update_counters->qemu_file_reset_rate_limit
最终在qemu_file_reset_rate_limit里进行进行重置:
void qemu_file_reset_rate_limit(QEMUFile *f)
{
    f->bytes_xfer = 0;
}
而xfer_limit通过调用qemu_file_set_rate_limit来设置:
void qemu_file_set_rate_limit(QEMUFile *f, int64_t limit)
{
    f->xfer_limit = limit;
}
不论是migrate_params_apply->qemu_file_set_rate_limit还是migrate_fd_connect->qemu_file_set_rate_limit,在未开启postcopy时,其值都被设置成s->parameters.max_bandwidth / XFER_LIMIT_RATIO),所以这里比较关键的就是max_bandwidth,max_bandwidth在如下代码定义:
DEFINE_PROP_SIZE("x-max-bandwidth", MigrationState,
                  parameters.max_bandwidth, MAX_THROTTLE),
其值为默认的MAX_THROTTLE就是128MB/s,对于因为网络带宽不足(可以测试添加打印发现f->bytes_xfer > f->xfer_limit总是满足)导致迁移失败的可以适当调大此参数,设置此参数的目的是防止迁移过程占用太多的带宽影响业务.
假设上次发送带宽没有超限,进入到了本节关注的第二阶段:迭代发送,继续往下分析migration_iteration_run函数:
static MigIterateState migration_iteration_run(MigrationState *s)
{
    uint64_t pending_size, pend_pre, pend_compat, pend_post;
    bool in_postcopy = s->state == MIGRATION_STATUS_POSTCOPY_ACTIVE;

    qemu_savevm_state_pending(s->to_dst_file, s->threshold_size, &pend_pre,
                              &pend_compat, &pend_post);
    pending_size = pend_pre + pend_compat + pend_post;

    trace_migrate_pending(pending_size, s->threshold_size,
                          pend_pre, pend_compat, pend_post);

    if (pending_size && pending_size >= s->threshold_size) {
        /* Still a significant amount to transfer */
        if (!in_postcopy && pend_pre <= s->threshold_size &&
            qatomic_read(&s->start_postcopy)) {
            if (postcopy_start(s)) {
                error_report("%s: postcopy failed to start", __func__);
            }
            return MIG_ITERATE_SKIP;
        }
        /* Just another iteration step */
        qemu_savevm_state_iterate(s->to_dst_file, in_postcopy);
    } else {
        trace_migration_thread_low_pending(pending_size);
        migration_completion(s);
        return MIG_ITERATE_BREAK;
    }

    return MIG_ITERATE_RESUME;
}
可以看到如果待发送的pending_size大于threshold_size,就会通过qemu_savevm_state_iterate再次进入迭代发送的流程,此时migration_iteration_run函数自然结束,返回MIG_ITERATE_RESUME状态到了migration_thread的while循环里,在调用migration_rate_limit更新一些统计信息后,就又会进入migration_iteration_run函数进行再一次的迭代发送,这就是整个迭代发送的过程.下面就继续详细分析migration_iteration_run函数.首先是pending_size的获取,通过qemu_savevm_state_pending函数获得pending_size,这可以由三部分组成,只能在dst端虚拟机启动前就要迁移到位的pre部分,在dst端虚拟机运行后可以做page fault从src现拉取的post方式,还有二者兼容的方式.qemu_savevm_state_pending的实现如下:
void qemu_savevm_state_pending(QEMUFile *f, uint64_t threshold_size,
                               uint64_t *res_precopy_only,
                               uint64_t *res_compatible,
                               uint64_t *res_postcopy_only)
{
    SaveStateEntry *se;

    *res_precopy_only = 0;
    *res_compatible = 0;
    *res_postcopy_only = 0;


    QTAILQ_FOREACH(se, &savevm_state.handlers, entry) {
        if (!se->ops || !se->ops->save_live_pending) {
            continue;
        }
        if (se->ops->is_active) {
            if (!se->ops->is_active(se->opaque)) {
                continue;
            }
        }
        se->ops->save_live_pending(f, se->opaque, threshold_size,
                                   res_precopy_only, res_compatible,
                                   res_postcopy_only);
    }
}
可以看到,该函数就是遍历每个save_state.handlers句柄,并调用save_live_pending回调函数去获得还有多少脏页需要发送,对于内存来说这个回调函数的实现就是ram_save_pending:
static void ram_save_pending(QEMUFile *f, void *opaque, uint64_t max_size,
                             uint64_t *res_precopy_only,
                             uint64_t *res_compatible,
                             uint64_t *res_postcopy_only)
{
    RAMState **temp = opaque;
    RAMState *rs = *temp;
    uint64_t remaining_size;

    remaining_size = rs->migration_dirty_pages * TARGET_PAGE_SIZE;

    if (!migration_in_postcopy() &&
        remaining_size < max_size) {
        qemu_mutex_lock_iothread();
        WITH_RCU_READ_LOCK_GUARD() {
            migration_bitmap_sync_precopy(rs);
        }
        qemu_mutex_unlock_iothread();
        remaining_size = rs->migration_dirty_pages * TARGET_PAGE_SIZE;
    }

    if (migrate_postcopy_ram()) {
        /* We can do postcopy, and all the data is postcopiable */
        *res_compatible += remaining_size;
    } else {
        *res_precopy_only += remaining_size;
    }
}
可以看到其主要的来源就是migration_dirty_pages量,这个量的更新在之前的脏页跟踪机制里介绍过,它通过如下流程在ramblock_sync_dirty_bitmap里更新:
static void ramblock_sync_dirty_bitmap(RAMState *rs, RAMBlock *rb)
{
    uint64_t new_dirty_pages =
        cpu_physical_memory_sync_dirty_bitmap(rb, 0, rb->used_length);

    rs->migration_dirty_pages += new_dirty_pages;
    rs->num_dirty_pages_period += new_dirty_pages;
}

migration_bitmap_sync_precopy->migration_bitmap_sync->ramblock_sync_dirty_bitmap
其中migration_bitmap_sync_precopy->migration_bitmap_sync->memory_global_dirty_log_sync先到内核里拿取脏页信息.在ram_save_pending函数里,如果不是postcopy(默认配置)且本次计算出的remaing_size小于max_size,就会调用migration_bitmap_sync_precopy去同步内核脏页信息到qemu,同步完再重新计算下remaining_size.max_size其实就是之前传入的threshold_size,threshold_size是根据当前轮实际发送时达到的带宽乘以可以接受的停机时间downtime_limit,也就是说threshold_size的值反映了在最后一轮能够发送的大小,关于它的详细计算后面分析migration_update_counters函数时还会涉及到.也就是说在可以进入第三阶段最后一轮发送时,还需要通过migration_bitmap_sync_precopy再次拉取脏页看看有没有更多的脏页可以发送的,这就是动态脏页更新与发送的机制.现在假如pending_size大于threshold_size,那么就会调用qemu_savevm_state_iterate进行迭代发送,qemu_savevm_state_iterate的主体逻辑很简单,也是遍历savevm_state.handlers上的回调句柄,依次调用save_live_iterate回调函数,这里主要关注内存模块的迭代回调函数ram_save_iterate:
while ((ret = qemu_file_rate_limit(f)) == 0 ||
        !QSIMPLEQ_EMPTY(&rs->src_page_requests)) {
    int pages;

    if (qemu_file_get_error(f)) {
        break;
    }

    pages = ram_find_and_save_block(rs, false);
    /* no more pages to sent */
    if (pages == 0) {
        done = 1;
        break;
    }

    if (pages < 0) {
        qemu_file_set_error(f, pages);
        break;
    }

    rs->target_page_count += pages;

    /*
     * During postcopy, it is necessary to make sure one whole host
     * page is sent in one chunk.
     */
    if (migrate_postcopy_ram()) {
        flush_compressed_data(rs);
    }

    /*
     * we want to check in the 1st loop, just in case it was the 1st
     * time and we had to sync the dirty bitmap.
     * qemu_clock_get_ns() is a bit expensive, so we only check each
     * some iterations
     */
    if ((i & 63) == 0) {
        uint64_t t1 = (qemu_clock_get_ns(QEMU_CLOCK_REALTIME) - t0) /
                      1000000;
        if (t1 > MAX_WAIT) {
            trace_ram_save_iterate_big_wait(t1, i);
            break;
        }
    }
    i++;
}
ram_save_iterate函数的主体就是一个不断寻找脏页并发送的过程,条件qemu_file_rate_limit之前介绍过,src_page_requests其实是支持postcopy的方式,就是dst端已经开始运行了,现在需要的页还在src端,所以发送请求,这些请求都挂在src_page_requests上,然后就是进一步调用ram_find_and_save_block去寻找脏页并发送:
static int ram_find_and_save_block(RAMState *rs, bool last_stage)
{
    PageSearchStatus pss;
    int pages = 0;
    bool again, found;

    /* No dirty page as there is zero RAM */
    if (!ram_bytes_total()) {
        return pages;
    }

    pss.block = rs->last_seen_block;
    pss.page = rs->last_page;
    pss.complete_round = false;

    if (!pss.block) {
        pss.block = QLIST_FIRST_RCU(&ram_list.blocks);
    }

    do {
        again = true;
        found = get_queued_page(rs, &pss);

        if (!found) {
            /* priority queue empty, so just search for something dirty */
            found = find_dirty_block(rs, &pss, &again);
        }

        if (found) {
            pages = ram_save_host_page(rs, &pss, last_stage);
        }
    } while (!pages && again);

    rs->last_seen_block = pss.block;
    rs->last_page = pss.page;

    return pages;
}
该函数首先是通过get_queued_page去处理是否有postcopy的请求,然后才是通过find_dirty_block找到脏页,最后调用ram_save_host_page发送,find_dirty_block->migration_bitmap_find_dirty使用RAMBlock.bmap去找到脏页信息,这点在之前的脏页机制节也介绍过,find_dirty_block的细节就不再介绍了,ram_save_host_page往下的流程本节也不打算详细分析了,因为脏页信息有了,现在无非就是遍历并发送,这里只是列出下后面的代码路径:
ram_save_host_page->ram_save_target_page->ram_save_page->save_normal_page->qemu_put_buffer*
qemu_put_buffer*类的接口往后最终会走到sendmsg套接字接口,前面的分析提到过.
这里还想分析下migration_rate_limit函数,之前提到过migration_rate_limit->migration_update_counters里会计算threshold_size,而这个值是控制能否进入第三阶段的一个关键阀值条件:
static void migration_update_counters(MigrationState *s,
                                      int64_t current_time)
{
    uint64_t transferred, transferred_pages, time_spent;
    uint64_t current_bytes; /* bytes transferred since the beginning */
    double bandwidth;

    if (current_time < s->iteration_start_time + BUFFER_DELAY) {
        return;
    }

    current_bytes = migration_total_bytes(s);
    transferred = current_bytes - s->iteration_initial_bytes;
    time_spent = current_time - s->iteration_start_time;
    bandwidth = (double)transferred / time_spent;
    s->threshold_size = bandwidth * s->parameters.downtime_limit;

    s->mbps = (((double) transferred * 8.0) /
               ((double) time_spent / 1000.0)) / 1000.0 / 1000.0;

    transferred_pages = ram_get_total_transferred_pages() -
                            s->iteration_initial_pages;
    s->pages_per_second = (double) transferred_pages /
                             (((double) time_spent / 1000.0));

    /*
     * if we haven't sent anything, we don't want to
     * recalculate. 10000 is a small enough number for our purposes
     */
    if (ram_counters.dirty_pages_rate && transferred > 10000) {
        s->expected_downtime = ram_counters.remaining / bandwidth;
    }

    qemu_file_reset_rate_limit(s->to_dst_file);

    update_iteration_initial_status(s);

    trace_migrate_transferred(transferred, time_spent,
                              bandwidth, s->threshold_size);
}
这里可以很清楚的看到,bandwidth是实际上次发送能达到的带宽,而downtime_limit是配置所能允许的停机时间,和实际带宽相乘,就是在这么多的停机时间里能发送多少数据,bandwidth之前提到过,没有其它原因的话,它就是配置能允许的最大带宽,这里主要看下downtime_limit的设置,其由如下代码定义:
DEFINE_PROP_UINT64("x-downtime-limit", MigrationState,
                  parameters.downtime_limit,
                  DEFAULT_MIGRATE_SET_DOWNTIME),
这里可以看到,其默认的时间设置就是300ms:
/* Time in milliseconds we are allowed to stop the source,
 * for sending the last part */
#define DEFAULT_MIGRATE_SET_DOWNTIME 300
在migration.json文件里也有解释:
# @downtime-limit: set maximum tolerated downtime for migration. maximum
#                  downtime in milliseconds (Since 2.8)
如果因为downtime_limit设置的较低而引起threshold_size过小而不能进入第三阶段,可以适当的调大downtime_limit.
在第二节的最后想分析下qemu提供的节流功能,该功能是解决虚拟机业务快速大量的产生脏页,但是发送脏页的线程其速率没有产生脏页的速率快,这就导致虚拟机迁移一直不能成功进入第三阶段,导致迁移失败.
在跌代发送函数migration_iteration_run里会通过qemu_savevm_state_pending去获取剩余还没迁移的内存,qemu_savevm_state_pending里调用ram提供的pending函数为ram_save_pending,ram_save_pending之前也分析过,这次主要关注其节流的逻辑:
static void ram_save_pending(QEMUFile *f, void *opaque, uint64_t max_size,
                             uint64_t *res_precopy_only,
                             uint64_t *res_compatible,
                             uint64_t *res_postcopy_only)
{
    ...
    if (!migration_in_postcopy() &&
        remaining_size < max_size) {
        qemu_mutex_lock_iothread();
        WITH_RCU_READ_LOCK_GUARD() {
            migration_bitmap_sync_precopy(rs);
        }
        qemu_mutex_unlock_iothread();
        remaining_size = rs->migration_dirty_pages * TARGET_PAGE_SIZE;
    }
    ...
}
之前有提到过,max_size就是threshold_size,每当剩余要发送的内存小于进入第三阶段的阀值时,就再次尝试通过migration_bitmap_sync_precopy去拉取新的可能的脏内存信息,也就是在migration_bitmap_sync_precopy->migration_bitmap_sync里有了节流的逻辑:
/* more than 1 second = 1000 millisecons */
if (end_time > rs->time_last_bitmap_sync + 1000) {
    migration_trigger_throttle(rs);

    migration_update_rates(rs, end_time);

    rs->target_page_count_prev = rs->target_page_count;

    /* reset period counters */
    rs->time_last_bitmap_sync = end_time;
    rs->num_dirty_pages_period = 0;
    rs->bytes_xfer_prev = ram_counters.transferred;
}
分析这段代码,节流动作的发生并不每次拉取脏页信息时都会发生,必须要超过1s才会进入这个逻辑,判断是否要节流是在migration_trigger_throttle函数里:
static void migration_trigger_throttle(RAMState *rs)
{
    MigrationState *s = migrate_get_current();
    uint64_t threshold = s->parameters.throttle_trigger_threshold;

    uint64_t bytes_xfer_period = ram_counters.transferred - rs->bytes_xfer_prev;
    uint64_t bytes_dirty_period = rs->num_dirty_pages_period * TARGET_PAGE_SIZE;
    uint64_t bytes_dirty_threshold = bytes_xfer_period * threshold / 100;

    /* During block migration the auto-converge logic incorrectly detects
     * that ram migration makes no progress. Avoid this by disabling the
     * throttling logic during the bulk phase of block migration. */
    if (migrate_auto_converge() && !blk_mig_bulk_active()) {
        /* The following detection logic can be refined later. For now:
           Check to see if the ratio between dirtied bytes and the approx.
           amount of bytes that just got transferred since the last time
           we were in this routine reaches the threshold. If that happens
           twice, start or increase throttling. */

        if ((bytes_dirty_period > bytes_dirty_threshold) &&
            (++rs->dirty_rate_high_cnt >= 2)) {
            trace_migration_throttle();
            rs->dirty_rate_high_cnt = 0;
            mig_throttle_guest_down(bytes_dirty_period,
                                    bytes_dirty_threshold);
        }
    }
}
这里有几个计算,一个是bytes_xfer_period表示上一个间隔里发送了多少字节,bytes_dirty_period表示上一个间隔里产生了多少字节的脏页,bytes_dirty_threshold是bytes_xfer_period按某个比例进行缩小的值,控制了后面能否调用mig_throttle_guest_down进行节流的动作,其实际表示的是初始脏页速率达到多少的比例就可以开始节流:
DEFINE_PROP_UINT8("x-throttle-trigger-threshold", MigrationState,
                  parameters.throttle_trigger_threshold,
                  DEFAULT_MIGRATE_THROTTLE_TRIGGER_THRESHOLD),
# @throttle-trigger-threshold: The ratio of bytes_dirty_period and bytes_xfer_period
#                              to trigger throttling. It is expressed as percentage.
#                              The default value is 50. (Since 5.0)
继续往下分析,控制是否要节流的还有一个条件migrate_auto_converge函数:
bool migrate_auto_converge(void)
{
    MigrationState *s;

    s = migrate_get_current();

    return s->enabled_capabilities[MIGRATION_CAPABILITY_AUTO_CONVERGE];
}
这其实表明了是否开启节流功能(自动聚合),它默认是不开启:
DEFINE_PROP_MIG_CAP("x-auto-converge", MIGRATION_CAPABILITY_AUTO_CONVERGE),
# @auto-converge: If enabled, QEMU will automatically throttle down the guest
#                 to speed up convergence of RAM migration. (since 1.6)
另外一个条件本文不关注,如果条件都满足,就会继续往下调用mig_throttle_guest_down:
static void mig_throttle_guest_down(uint64_t bytes_dirty_period,
                                    uint64_t bytes_dirty_threshold)
{
    MigrationState *s = migrate_get_current();
    uint64_t pct_initial = s->parameters.cpu_throttle_initial;
    uint64_t pct_increment = s->parameters.cpu_throttle_increment;
    bool pct_tailslow = s->parameters.cpu_throttle_tailslow;
    int pct_max = s->parameters.max_cpu_throttle;

    uint64_t throttle_now = cpu_throttle_get_percentage();
    uint64_t cpu_now, cpu_ideal, throttle_inc;

    /* We have not started throttling yet. Let's start it. */
    if (!cpu_throttle_active()) {
        cpu_throttle_set(pct_initial);
    } else {
        /* Throttling already on, just increase the rate */
        if (!pct_tailslow) {
            throttle_inc = pct_increment;
        } else {
            /* Compute the ideal CPU percentage used by Guest, which may
             * make the dirty rate match the dirty rate threshold. */
            cpu_now = 100 - throttle_now;
            cpu_ideal = cpu_now * (bytes_dirty_threshold * 1.0 /
                        bytes_dirty_period);
            throttle_inc = MIN(cpu_now - cpu_ideal, pct_increment);
        }
        cpu_throttle_set(MIN(throttle_now + throttle_inc, pct_max));
    }
}
该函数涉及到了迁移的很多参数,先看下这些参数的作用,先是cpu_throttle_initial,它指定了第一次激活节流操作时,应该限制多少cpu运行时间:
# @cpu-throttle-initial: Initial percentage of time guest cpus are throttled
#                        when migration auto-converge is activated. The
#                        default value is 20. (Since 2.7)
DEFINE_PROP_UINT8("x-cpu-throttle-initial", MigrationState,
                  parameters.cpu_throttle_initial,
                  DEFAULT_MIGRATE_CPU_THROTTLE_INITIAL),
#define DEFAULT_MIGRATE_CPU_THROTTLE_INITIAL 20
所以cpu_throttle_active发现throttle_percentage为0还没有设置时,就会以这个cpu_throttle_initial去设置.
再看cpu_throttle_increment,它表示在每次需要加大节流的力度时,每次递增多少节流的量:
# @cpu-throttle-increment: throttle percentage increase each time
#                          auto-converge detects that migration is not making
#                          progress. The default value is 10. (Since 2.7)
DEFINE_PROP_UINT8("x-cpu-throttle-increment", MigrationState,
                  parameters.cpu_throttle_increment,
                  DEFAULT_MIGRATE_CPU_THROTTLE_INCREMENT),
#define DEFAULT_MIGRATE_CPU_THROTTLE_INCREMENT 10
可以看到默认就是增加10,不过这个值要看是否开启了tailslow,没开才会有用.下面看下cpu_throttle_tailslow参数的作用:
# @cpu-throttle-tailslow: Make CPU throttling slower at tail stage
#                         At the tail stage of throttling, the Guest is very
#                         sensitive to CPU percentage while the @cpu-throttle
#                         -increment is excessive usually at tail stage.
#                         If this parameter is true, we will compute the ideal
#                         CPU percentage used by the Guest, which may exactly make
#                         the dirty rate match the dirty rate threshold. Then we
#                         will choose a smaller throttle increment between the
#                         one specified by @cpu-throttle-increment and the one
#                         generated by ideal CPU percentage.
#                         Therefore, it is compatible to traditional throttling,
#                         meanwhile the throttle increment won't be excessive
#                         at tail stage.
#                         The default value is false. (Since 5.1)
DEFINE_PROP_BOOL("x-cpu-throttle-tailslow", MigrationState,
                  parameters.cpu_throttle_tailslow, false),
如果开启了这个参数,先要算下理想的cpu能使用的算力cpu_ideal,它是现在的cpu算里cpu_now乘以一个比率,这个比率是传送速率的一半(在父函数migration_trigger_throttle里默认折算为一半)比上脏页产生的速率,换句话说,只有脏页产生速率是传送速率的一半时,cpu_ideal才会稳定下来而不会被一个0-1的比率值缩放小,都了cpu_ideal,再来看现在的cpu算力cpu_now和cpu_ideal的差距,就是还需要节流多少cpu算力,最后在throttle_inc和默认的增加节流的幅度pct_increment间选择较小的,然后通过cpu_throttle_set去设置节流的值,但是现在要设置的throttle_now+throttle_inc和pct_max之间也要取最小值,这里就又涉及一个参数max_cpu_throttle:
# @max-cpu-throttle: maximum cpu throttle percentage.
#                    Defaults to 99.
#                    (Since 3.1)
DEFINE_PROP_UINT8("max-cpu-throttle", MigrationState,
                  parameters.max_cpu_throttle,
                  DEFAULT_MIGRATE_MAX_CPU_THROTTLE),
#define DEFAULT_MIGRATE_MAX_CPU_THROTTLE 99
max_cpu_throttle控制了最大能节流多少cpu算力,现在继续往下分析cpu_throttle_set:
void cpu_throttle_set(int new_throttle_pct)
{
    /*
     * boolean to store whether throttle is already active or not,
     * before modifying throttle_percentage
     */
    bool throttle_active = cpu_throttle_active();

    /* Ensure throttle percentage is within valid range */
    new_throttle_pct = MIN(new_throttle_pct, CPU_THROTTLE_PCT_MAX);
    new_throttle_pct = MAX(new_throttle_pct, CPU_THROTTLE_PCT_MIN);

    qatomic_set(&throttle_percentage, new_throttle_pct);

    if (!throttle_active) {
        cpu_throttle_timer_tick(NULL);
    }
}
这个函数继续将要节流的百分比钳制在CPU_THROTTLE_PCT_MAX和CPU_THROTTLE_PCT_MIN之间,同时通过qatomic_set来设置全局的节流比分比变量throttle_percentage为new_throttle_pct,如果这个值还没有被设置过(之前为0),那么就是首次开启节流功能,通过调用cpu_throttle_timer_tick函数来开启:
static void cpu_throttle_timer_tick(void *opaque)
{
    CPUState *cpu;
    double pct;

    /* Stop the timer if needed */
    if (!cpu_throttle_get_percentage()) {
        return;
    }
    CPU_FOREACH(cpu) {
        if (!qatomic_xchg(&cpu->throttle_thread_scheduled, 1)) {
            async_run_on_cpu(cpu, cpu_throttle_thread,
                             RUN_ON_CPU_NULL);
        }
    }

    pct = (double)cpu_throttle_get_percentage() / 100;
    timer_mod(throttle_timer, qemu_clock_get_ns(QEMU_CLOCK_VIRTUAL_RT) +
                                   CPU_THROTTLE_TIMESLICE_NS / (1 - pct));
}
这个函数逻辑还是简单的,首先通过cpu_throttle_get_percentage判断下当前的节流的百分比为0话意味着没有必要进行节流操作,然后就是CPU_FOREACH针对每个虚拟cpu运行cpu_throttle_thread进行节流,不过条件是每个vcpu还没有开始节流,也就是qatomic_xchg返回的throttle_thread_scheduled的旧值为0.
最后的两行代码是比较有意思的,它需要结合cpu_throttle_thread函数才能理解深刻,现在先单就理解这两句,首先pct表示的是节流的一个百分比,本来节流的值是0-99的整型数值,现在就是把她转换成了一个0-1的百分比的小数.timer_mod调用是想修改throttle_timer这个定时器的下一次超时时间,timer_mod的回调函数就是cpu_throttle_timer_tick:
void cpu_throttle_init(void)
{
    throttle_timer = timer_new_ns(QEMU_CLOCK_VIRTUAL_RT,
                                  cpu_throttle_timer_tick, NULL);
}
也就是说,在经过CPU_THROTTLE_TIMESLICE_NS / (1 - pct)了这么多时间后,就会再次进入cpu_throttle_timer_tick进行节流.CPU_THROTTLE_TIMESLICE_NS是默认的时间片:
#define CPU_THROTTLE_TIMESLICE_NS 10000000
可以看到为10ms,那为什么不直接使用这个时间片作为周期而要乘以1/(1-pct),这里个人分析作者的意图是,在cpu节流过程中,cpu的算力是逐步降低的,按固定频率运行某个回调函数(或者说成按固定频率执行某项任务)这种节奏本身就是不对的,因为cpu算力不是恒定不变的,所以执行节流回调这件任务也当以一个变化的周期来执行,而不是恒定的.那么这个变化的周期应当怎么变化呢,是变大还是变小?可以想见,随着cpu算力的下降,那么这个周期应该拉长变大,也就是说,cpu算力既然已经下降了,就不能花费太多的cpu执行时间去执行一个回调,所以pct越大1/(1-pct)越大,隔的越久才再次执行节流回调.继续看cpu_throttle_thread函数:
static void cpu_throttle_thread(CPUState *cpu, run_on_cpu_data opaque)
{
    double pct;
    double throttle_ratio;
    int64_t sleeptime_ns, endtime_ns;

    if (!cpu_throttle_get_percentage()) {
        return;
    }

    pct = (double)cpu_throttle_get_percentage() / 100;
    throttle_ratio = pct / (1 - pct);
    /* Add 1ns to fix double's rounding error (like 0.9999999...) */
    sleeptime_ns = (int64_t)(throttle_ratio * CPU_THROTTLE_TIMESLICE_NS + 1);
    endtime_ns = qemu_clock_get_ns(QEMU_CLOCK_REALTIME) + sleeptime_ns;
    while (sleeptime_ns > 0 && !cpu->stop) {
        if (sleeptime_ns > SCALE_MS) {
            qemu_cond_timedwait_iothread(cpu->halt_cond,
                                         sleeptime_ns / SCALE_MS);
        } else {
            qemu_mutex_unlock_iothread();
            g_usleep(sleeptime_ns / SCALE_US);
            qemu_mutex_lock_iothread();
        }
        sleeptime_ns = endtime_ns - qemu_clock_get_ns(QEMU_CLOCK_REALTIME);
    }
    qatomic_set(&cpu->throttle_thread_scheduled, 0);
}
这个函数里终于看到了所谓节流到底是什么操作,其实就是sleep,将vcpu对应的线程睡眠就是类似于物理cpu的降频操作,这里最关键的是睡多久,1/(1-pct)相当于是整个周期的长度,用pct睡眠占比除以(1-pct)就是睡眠的时间了,这样可以保证在某个(变化的)周期内,睡眠占pct,而运行占1-pct,然后在while循环里,只要没睡够这么多时间,就会循环一直睡.而一旦睡够了,throttle_thread_scheduled就会被设置为0,这会使得cpu_throttle_timer_tick定时器回调函数执行时看到它为0,进而开启新一轮的睡眠.
以上就是迁移第二阶段的分析.
5. 迁移第三阶段
最后一个阶段不打算详细分析了,因为这一阶段就没有多少数据需要传送了,之前的分析已经详细说明了进入第三阶段的条件.第三阶段主要就是停止src端的虚拟机,并统计一下downtime的时间等,代码就略过不详加分析了.
6. dst端还原虚拟机
dst还原虚拟机需要以migrate-incoming命令运行qemu进程,这样qemu起来后走qmp_migrate_incoming函数去接受src发来的内存.
qemu里qmp相关的代码用于处理json数据格式的命令,主要针对编程方式与qemu交互(相对的,qemu还提供一种和其交互的方式叫hmp,这主要是给人类进入monitor后台/或其它界面比如virsh以键盘输入命令的方式),典型的比如libvirt.libvirt会事先在dst端以defer启动/usr/libexec/qemu-kvm,随后构建migrate-incoming json命令发给qemu进程,这会导致qemu最终来到ram_load去还原内存.下面先介绍这个整体过程的代码实现细节,再介绍一点还原内存的细节.
libvirt里启动虚拟机的流程都会来到qemuProcessStart函数,对于热迁移的情况,其migrateFrom参数有值,这样就会生成一个qemuProcessIncomingDef结构体,用来描述从哪里接受内存:
int
qemuProcessStart(virConnectPtr conn,
                 virQEMUDriver *driver,
                 virDomainObj *vm,
                 virCPUDef *updatedCPU,
                 virDomainAsyncJob asyncJob,
                 const char *migrateFrom,
                 int migrateFd,
                 const char *migratePath,
                 virDomainMomentObj *snapshot,
                 virNetDevVPortProfileOp vmop,
                 unsigned int flags)
{
    ...
    qemuProcessIncomingDef *incoming = NULL;
    ...
    if (migrateFrom) {
    incoming = qemuProcessIncomingDefNew(priv->qemuCaps, NULL, migrateFrom,
                                         migrateFd, migratePath);
    if (!incoming)
        goto stop;
    }
}
有了incoming,随后qemuProcessStart先通过qemuProcessLaunch函数使用execv系统调用启动/usr/libexec/qemu-kvm,然后qemuProcessStart又会调用qemuMigrationDstRun给这个qemu-kvm进程以json的格式发送migrate-incoming命令,先看启动/usr/libexec/qemu-kvm的过程:
qemuProcessStart->qemuProcessLaunch->virCommandRun->virCommandRunAsync->virExec
在最后的virExec便有:
if (cmd->env)
    execve(binary, cmd->args, cmd->env);
else
    execv(binary, cmd->args);
binary先就通过virExec->virCommandGetBinaryPath调用从virCommand结构体里得到,其实就是virCommand:binaryPath.
再来看给起来的qemu进程发送migrate-incoming json命令的过程:
qemuProcessStart->qemuMigrationDstRun->qemuMonitorMigrateIncoming->qemuMonitorJSONMigrateIncoming
qemuMonitorJSONMigrateIncoming的实现如下:
int
qemuMonitorJSONMigrateIncoming(qemuMonitor *mon,
                               const char *uri)
{
    g_autoptr(virJSONValue) cmd = NULL;
    g_autoptr(virJSONValue) reply = NULL;

    if (!(cmd = qemuMonitorJSONMakeCommand("migrate-incoming",
                                           "s:uri", uri,
                                           NULL)))
        return -1;

    if (qemuMonitorJSONCommand(mon, cmd, &reply) < 0)
        return -1;

    return qemuMonitorJSONCheckError(cmd, reply);
}
在这里可以十分明确的看到通过qemuMonitorJSONMakeCommand构建了json格式的migrate-incoming命令,并且使用qemuMonitorJSONCommand函数去给qemu进程发送这个命令,这个发送过程本文不研究了,因为那和本文的主题相去甚远,总结来说这个过程就是使用进程通信方式(libvirt使用GScoket)去发送数据到另一个进程.
下面介绍下qemu接收到命令的处理过程,qemu侧收到migrate-incoming命令时,其对应的处理函数其实就是qmp_migrate_incoming,但是这种对应的调用关系并不是那么明晰.这涉及到qapi接口,qemu有一个文件叫qapi/migration.json,里面描述了迁移相关的一些命令,比如对于migrate-incoming来说有:
##
# @migrate-incoming:
#
# Start an incoming migration, the qemu must have been started
# with -incoming defer
#
# @uri: The Uniform Resource Identifier identifying the source or
#       address to listen on
#
# Returns: nothing on success
#
# Since: 2.3
#
# Notes:
#
# 1. It's a bad idea to use a string for the uri, but it needs to stay
#    compatible with -incoming and the format of the uri is already exposed
#    above libvirt.
#
# 2. QEMU must be started with -incoming defer to allow migrate-incoming to
#    be used.
#
# 3. The uri format is the same as for -incoming
#
# Example:
#
# -> { "execute": "migrate-incoming",
#      "arguments": { "uri": "tcp::4446" } }
# <- { "return": {} }
#
##
{ 'command': 'migrate-incoming', 'data': {'uri': 'str' } }
最后一行是真正libvirt以json格式发送给qemu的数据,可以看到里面有要执行的命令migrate-incoming,以及数据.前面的描述都是注释,解释这个命令是干嘛的,并且可以看到,一般迁移使用的端口是4446,协议是tcp.一旦在migration.json里配置了一个命令,在编译构建的时候,scripts/qapi下的脚本会解析这个json文件,最终会在build/qapi/qapi-init-commands.c里生成C函数调用qmp_register_command以绑定命令以及对应命令的处理函数,scripts/qapi下的Python脚本解析.json配置文件,其中一个最主要的工作就是将migrate-incoming这样配置的串,转换成migrate_incoming,并在其前拼上qmp_串,最终组成qmp_migrate_incoming串(符号),这个名字的函数在qemu代码里是有定义的,这其实就对qemu侧编写qmp接口和libvirt交互提出了命名约束,比如.json有aaa-bbb这样的命令,那么在qemu里就要有qmp_aaa_bbb这样的函数来处理aaa-bbb命令,简单的使用:
grep qmp_ scripts/qapi -Rn
可以看到:
scripts/qapi/commands.py:46:%(c_type)s qmp_%(c_name)s(%(params)s);
这种拼接的逻辑.
以社区较新的qemu代码(而不是qemu 6.2,但原理一样)一份编译结果可以看到json里的命令名字和对应的处理函数的绑定动作,对qmp_register_command的调用诚如前面提到的,是由py脚本在编译时自动生成在build/qapi/qapi-init-commands.c文件里:
qmp_register_command(cmds, "migrate-incoming",
                     qmp_marshal_migrate_incoming, 0, 0);
而qmp_register_command的实现如下:
void qmp_register_command(QmpCommandList *cmds, const char *name,
                          QmpCommandFunc *fn, QmpCommandOptions options,
                          unsigned special_features)
{
    QmpCommand *cmd = g_malloc0(sizeof(*cmd));

    /* QCO_COROUTINE and QCO_ALLOW_OOB are incompatible for now */
    assert(!((options & QCO_COROUTINE) && (options & QCO_ALLOW_OOB)));

    cmd->name = name;
    cmd->fn = fn;
    cmd->enabled = true;
    cmd->options = options;
    cmd->special_features = special_features;
    QTAILQ_INSERT_TAIL(cmds, cmd, node);
}
可见其就是用传进来的命令名字migrate-incoming以及对应的处理函数qmp_marshal_migrate_incoming来生成了QmpCommand命令,并加入到了cmds这个全局的命令表里,当然对于qemu 6.2来说没有qmp_marshal_migrate_incoming这样的函数,而是qmp_migrate_incoming去处理,但原理一样.
libvirt的命令发过来后,最终就会来到qmp_dispatch取出cmd里的fn去执行:
if (!!(cmd->options & QCO_COROUTINE) == qemu_in_coroutine()) {
    monitor_set_cur(qemu_coroutine_self(), cur_mon);
    cmd->fn(args, &ret, &err);
    monitor_set_cur(qemu_coroutine_self(), NULL);
} else {
以上就是QMP的工作流程,总之最后就是通过qmp_migrate_incoming函数,dst进入了接收内存并还原的流程里.对于迁移了需要还原状态的模块(典型的比如内存),都会在SaveVMHandlers:load_state这个成员里实现还原的办法,所以最终针对内存的还原通过以下流程可以到达load_state(ram_load)函数:
qmp_migrate_incoming->qemu_start_incoming_migration->socket_start_incoming_migration->socket_start_incoming_migration_internal->
socket_accept_incoming_migration->migration_channel_process_incoming->migration_ioc_process_incoming->migration_incoming_process->
process_incoming_migration_co->qemu_loadvm_state->qemu_loadvm_state_main->qemu_loadvm_section_part_end/qemu_loadvm_section_start_full->
vmstate_load->load_state(ram_load)
后续的ram_load本文不再介绍,这可以另开一个大的主题在另外的文档介绍.
7. 调参指南
虚拟机热迁移,有众多参数可以调节以影响迁移的成功率,以下对这些参数逐一介绍,不同的场景最合适的参数肯定是不一样的,这里给出解释和调节的影响,具体的场景需要具体的调测适配,注意以下参数是有优先的,排在前面的是尽量先尝试的,本表没提到的其它参数建议保持默认值(或者将来会继续出其它参数的建议设置和原理解释,但是这个表的参数是最重要最关键能影响热迁移是否成功).以下主要针对6.2的qemu,不过有些参数4.2也是有的:
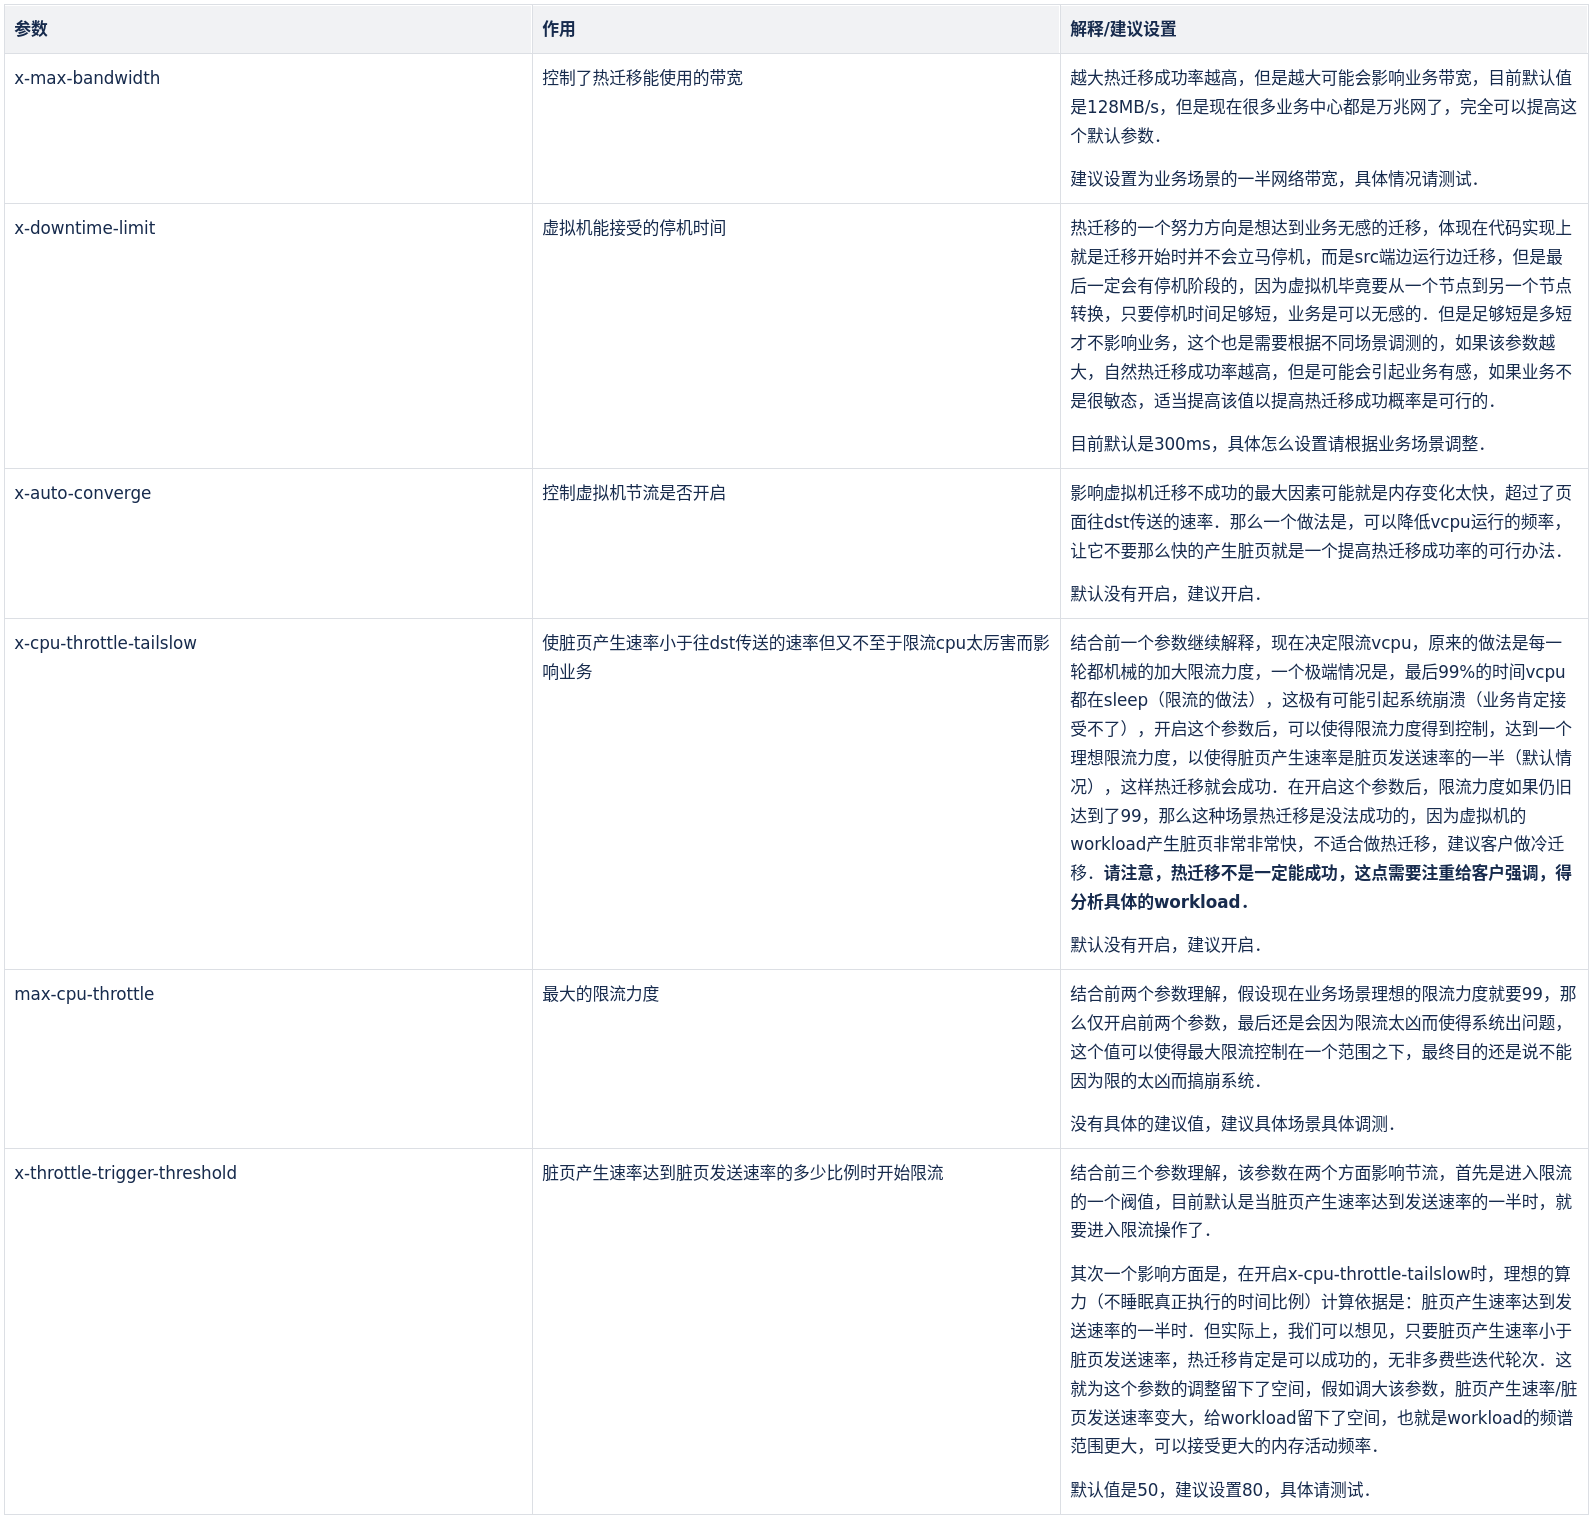
Figure 1: 热迁移调参数指南